
Frequently Asked Questions about Corada
FAQ: What does Corada mean?
CORADA is an acronym for the Comprehensive Resource for the Americans with Disabilities Act.
We have input federal ADA standards and regulations and connected access-related content, such as technical assistance, products and services, how-to videos, CAD/BIM files, design ideas, professional Opinions, links and additional resources to form a robust, searchable database.
FAQ: Why was Corada created?

Watch: Why Corada?
Evan Terry Associates created Corada for the purpose of helping people to identify, to understand, and to meet their obligations under the ADA and other access requirements and to help all of us be more efficient and effective in our work. Corada was built with the following goals in mind:
-
To accumulate a rich database of all types of useful information related to accessibility into one place
-
To make it as widely available and as affordable as possible for everyone who needs to use it
-
To reduce the time it takes to locate relevant information by meta-tagging everything to maximize the effectiveness of searches and improve its usability
-
To accommodate and integrate all types of media within the same information framework
-
To facilitate useful and detailed conversations about all things access-related and to integrate those conversations into the same information framework to make them easy to find on any topic
-
To significantly elevate the level of competency of novices and experts alike by making more information instantly available including topic-specific and general training, detailed solutions and products to solve both common and difficult access problems
-
To accommodate all users by complying with and exceeding WCAG requirements for web accessibility
FAQ: When was Corada launched?
Corada made its public debut at the National ADA Symposium in Atlanta, GA on May 10, 2015.

Watch: Happy 1st Birthday, Corada! with a message from Jim Terry, CEO of Evan Terry Associates (2:49)
FAQ: What does "powered by Evan Terry Associates" mean?
Corada was developed and is maintained by Evan Terry Associates, for the purpose of helping people to identify, to understand, and to meet their obligations under the ADA and other access requirements.

ETA is an architecture firm that is well-known for having a team of ADA experts who have extensive knowledge and experience with access compliance. ETA is committed to the “Universal Design” concept for facility accessibility. Their architectural projects are designed to ensure access to buildings and facilities for all people, including those with disabilities. Their expert ADA team offers detailed ADA facility surveys, plan reviews, training, expert witness and product consulting on a regular basis to healthcare facilities, large corporations, and federal, state and local government clients. ETA’s work with ADA has earned the firm a nationwide reputation as one of the leaders in the field of accessible design. Corada taps into this collective knowledge to ensure the information presented on our site is correct and thorough.
FAQ: What is Corada's commitment to web accessibility?
The fundamental purpose of Corada is to help everyone to identify, to understand, and to meet their obligations under the ADA and other access requirements. That objective can only be accomplished when everyone has access to our site. We developed the site using the Web Content Accessibility Guidelines 2.0 (WCAG 2.0) with Level A compliance at a minimum and Levels AA and AAA where the technology allows.
We strive to serve everyone with Corada’s content and features. Both web accessibility professionals and users with disabilities have pre-tested our site to ensure accessibility. However, if you have any feedback or suggestions that would help us to further refine our site, or if you need to report an accessibility issue, please use the "User Feedback or Help" button that’s available on every page.
Note: Corada does link to third-party information and resources that may not be accessible to all users. Corada is not responsible for the content of linked third-party sites, sites framed within the Corada site, third-party sites provided as search results, or third-party advertisements, and does not make any representations regarding their content, accuracy or accessibility.
FAQ: Is Corada an app that requires frequent updating?
No, Corada is not an app. Corada is an online platform that is updated continuously by our team. It is accessible anytime users have an internet connection; and is compatible with mobile devices for convenient use in the field. Each time users come to Corada, they access our most up-to-date content and features, in real-time.
FAQ: Is there a fee for using Corada?
All of the federal ADA regulations and standards, dozens of federal technical assistance documents and products/services to improve accessibility will ALWAYS BE FREE on Corada.
To take advantage of Corada’s features, we encourage you to register and choose an access level plan that best suits your needs. The Access Levels are as follows:
-
Registered User: Free
-
Premium Level: $10/year
-
Accessibility Specialist Level: $50/year
Click here to read more details about the features available with each level.
While we try to keep the costs of using Corada very low, there are discounts available!
-
Volume Discount: Sign up your project team or staff at a discounted rate! Click here for more details.
-
Partnering Association Discount: Are you a member of a professional organization that partners with Corada? If so, you may be eligible for a complimentary or discounted subscription. If you are a member of more than one, you may be eligible for credit in your Corada account to use for upgrading your subscription or one of ETA's pocket guide publications. Click here for more details.
-
Conference Discount: Are you attending a conference or seminar where Corada has a booth? Come by and ask what discounts are available for conference attendees!
FAQ: What are the different subscription levels, features and pricing?
Watch: Sign Up and Subscription

There are 3 levels of access in Corada:
-
Registered User: Free
-
Premium Level: $10/year
-
Accessibility Specialist Level: $50/year
Click here to read more details about each subscription level.
FAQ: How do I sign up?

Watch: Sign Up and Subscription
How to sign up for Corada:
1. From the home page, click on the "SIGN UP" button; or click "Sign up!” at the top right corner of the site.
2. This will take you to the Access Level page (Registration step 1 of 6). Choose the level of access that best suits your needs and click "Select." If you are a new user, and would like to try Premium Level access, click here or click on the "START FREE 14 DAY TRIAL" button.
3. Complete the registration steps.
4. Check your email! You should receive one to confirm your email address and another welcoming you to Corada, with more information about features and content.
FAQ: How do I sign up for multiple subscriptions for me, my colleagues, co-workers or staff?
Signing up for multiple subscriptions is quick and easy; all managed under one persons' account and all on one method of payment.
To sign up multiple subscriptions under one account:
1. Click here or click on "Sign Up!” at the top right corner of the site.
2. This will take you to the Access Levels page; choose the user level you wish and click “Select” (Registration Step 1 of 6).
-
Registration Step 2: Enter your name and email address. Create and confirm a password.
-
Registration Step 3: Next, you will select if you are a member of any of Corada’s partnering associations. Select all that apply. For example, for ACTCP membership, click the toggle to say “Yes” and enter your membership ID. Click the “Submit” button.
-
Registration Step 4: Here is where you will add users to your subscription (from this page, you may also review the Group Discount Schedule). Click "Add user." Enter each users' name and email address. Click "Add user" to add more or "Remove" to remove a user. Continue until all users are input. Click "Submit." The system will automatically notify the users they have been added to your subscription. They will each be sent a link to use to login and confirm their subscription.
-
Registration Step 5: Review your selections and enter your credit card information.
-
Registration Step 6: Confirm your selections or edit if needed. Click "Submit."
3. If you are an existing Corada user and wish to add people to your existing subscription, read this FAQ.
FAQ: How do I add or remove colleagues, co-workers or staff to/from my existing Corada subscription?
To add/remove people from your subscription:
1. Login to Corada.
2. Click on "My Account" at the top right corner of the home page and select "Settings."
3. Under the "Subscription" heading, click "Add/Remove Users."
4. Follow the steps to add or remove users.
-
Note: Each user will be automatically notified via email regarding the change in their subscription.
FAQ: How do I upgrade my subscription?
You may change your subscription level at any time in your User Account! Upgrading to a Premium or Accessibility Specialist level subscription will provide access to more Corada content such as selected state accessibility requirements, "how to measure" videos and joining in Voices discussions. In addition, these subscription levels will grant you access to two of Corada's newest and exciting features: Corada WorkSpace and WorkGroups!
To upgrade your subscription:
1. Login and click on "My Account" at the top right corner of the site.
2. Click on "Settings."
3. Scroll down to "Subscription" and click on "Change Plans."
4. Click the "Select" button for the desired plan.
5. Click the "Update Plan" button.
FAQ: Does my Corada subscription automatically renew each year?
Yes, for your convenience, your Corada subscription will renew each year until you choose to cancel it (assuming the credit card associated with your account is still valid). However, one week before auto-renewal, you will receive an email reminding you of this, with an option to cancel your subscription at that time.
FAQ: Can I get a refund if I no longer want my paid Corada subscription?
Since we offer a majority of our content for free, a 14-day free trial at the Premium level and many Association or promotional discounts, we are unable to issue refunds for Corada subscriptions purchased, at this time. This is one way we can keep subscription prices very low! Feel free to Contact Us with any questions or concerns.
FAQ: What professional associations have partnered with Corada to provide discounted or complimentary subscriptions?
-
CASI - Certified Access Specialist Institute
-
NAADAC - National Association of ADA Coordinators
-
ACTCP - ADA Coordinator Training Certification Program
-
APA - Accessibility Professionals Association
Note: This list is subject to change at any time, based on the Associations' decision regarding their members' benefits.
Would you like to offer members of your organization access to Corada at a discounted rate? Contact us!
FAQ: I am a member of a professional association that provides complimentary Corada subscriptions as a benefit of membership. Can I add on colleagues, co-workers or staff to my subscription at the organization's discounted rate?
Because these organizations choose to provide Corada subscriptions as a benefit of membership, any person added to your Group subscription who is NOT a member of one of these organizations, will be charged regular price for their Corada subscription - - just $10/year for Premium level access and $50/year for Accessibility Specialist access. Read more about subscription plans here!
Note: If you are a member of more than one professional organization that provides complimentary Corada subscriptions and you have accumulated account credits, this personal credit may be used to add a colleague or staff member to your subscription if you choose to use it for that purpose. Account credits are yours to use for a subscription level upgrade (from Premium to Accessibility Specialist) or to add on members to your Group subscription. Account credit never expires.
FAQ: I am an existing Corada user but am also a member of one of Corada's partnering associations or attended an event with a promo code. How do I get my discount or credit?
Thank you for being a Corada user! To add your association membership information, enter an event promo code and/or select your pocket guide, just follow these steps:
1. Login to Corada.
2. Click on "My Account" and select “Settings.”
3. Scroll down to “Subscription” and click “Add Association/Event.”
4. Next, you will select if you are a member of any of Corada’s partnering associations. Select all that apply. For example, for ACTCP membership, click the toggle to say “Yes” and enter your membership ID. Click the “Submit” button.
5. Next, you will see the opportunity to select a discounted or complimentary PDF pocket guide (if applicable; depending on which organization for which you are a member). The titles currently available are:
-
Pocket Guide to the 2010 ADA Standards for Accessible Design
-
Pocket Guide to the 2013 California Standards for Accessible Design
-
Pocket Guide to the ABA Accessibility Standards for GSA Facilities
6. No payment is required, but you must click “Okay!” to confirm your updated settings.
And if you are already a Corada user with a paid subscription, you will receive an account credit in the amount the organization paid for bulk subscriptions. For example, if the organization paid $7 for each subscription, you will receive a $7 credit.
Account credit may be used toward the cost of an upgrade to Accessibility Specialist level access; or, if you already have an Accessibility Specialist level subscription, you may accumulate your credits until your annual Corada renewal, or request that we process a refund for this amount. Account credit never expires and may always be accessed by going to "My Account” and clicking on “Settings.”
FAQ: If I am a member of more than one partnering associations, will I receive Corada account credit?

Yes! If you are a member of MORE than one professional organization who has partnered with Corada to provide free subscriptions as a benefit of membership, you will receive account credits for EACH organization of which you are a member. For example, if you are a member of Organization A and Organization B; and “A” paid Corada $7 for each subscription and “B” paid $7, then you will have a total of $14 credit applied to your account.
Account credit may be used toward the cost of an upgrade to Accessibility Specialist level access; or, if you already have an Accessibility Specialist level subscription, you may accumulate your credits until your annual Corada renewal, or request that we process a refund for this amount. Account credit never expires and may always be accessed by going to "My Account” and clicking on “Settings.”
Also, if you are a member of one of the organizations providing complimentary Corada subscriptions as a benefit of membership, and you ALREADY have a paid Corada subscription, you will also receive an account credit in the amount the organization paid for bulk subscriptions. For example, if the organization paid $7 for each subscription, you will receive a $7 account credit.
FAQ: How do I login?
To login:
1. Click “Login" at the top right corner of the site.
2. Enter your email address and password where prompted and click “Sign in".
FAQ: I do not see "Login" or "Sign Up." I only see "My Account." How do I login?
1. If you do not see "Login | Sign Up!" at the top right corner of the site, this means you are already logged in.
2. If the "Welcome Back" greeting at the top right corner of the site does not have your name in it, click on "My Account" and select "Logout." Then log back into the site with your email address and password.
FAQ: I can't remember my password. How do I reset it?
To reset your password:
1. Click “Login” at the top right corner of the site.
2. On the sign in screen, click on the “Forgot your password?” link.
3. Enter your email address when prompted, click “Submit” and a password change token will be emailed to you.
FAQ: How do I feature myself or my company on the "Find An Accessibility Specialist" page?
To feature your services on the Find an Accessibility Specialist page, you must have a Accessibility Specialist level subscription. If you are not currently a subscriber, sign up here! If you are currently a Premium user, here are the steps to upgrading your subscription.
To feature your services:
1. Once you are a Corada subscriber at the Accessibility Specialist level, click on the “Find an Accessibility Specialist” button on the top right corner of the site.
2. At the top of this page, click the link, Just update your profile!
3. On your profile page, you may edit your Bio, upload your Resume, and edit your Professional Details; Professional Details is the portion that will be displayed on the “Find an Accessibility Specialist” page.
4. When prompted “Feature me or my business in “Find an Accessibility Specialist’”, select "Yes."
5. Fill in your details in this form, and click “Save” at the bottom of the page.
FAQ: I uploaded a resume, profile photo and/or entered a bio. How do I make it public or private?
If you have uploaded a resume, profile photo and/or entered a biography, but don't see it, this is because the privacy settings for these items are set to "private."
If you have uploaded a resume, profile photo and/or entered a biography and no longer wish to share these publically, you may edit your privacy settings to omit these from public view.
To edit your privacy settings:
1. Login to Corada.
2. Click on "My Account" and select "Settings."
3. Click on "Update Privacy Settings" and check or uncheck boxes as needed.
4. Click the "Update Privacy Settings" button.
FAQ: How do I opt-in or opt-out of the Corada Newsletter?
To opt-in or -out of the Corada Newsletter:
1. Login to Corada
2. Click on "My Account" and select Settings.
3. Scroll down to "Email Preferences" and click on Update Email Preferences.
4. Check or uncheck the "Corada Newsletter" box and click "Update."
FAQ: How do I browse and search content?
To browse and search content, you may either:
Watch: How to Browse & Search Content

1. Click on "Browse Content"
-
This button is located in the top navigation of each page in Corada. You can browse by Information Type or Media Type. In the Information Type tab, both the main categories and subcategories are clickable. This takes you to a listing of all current content within that category. The other tab allows you to browse all content by Media Type.
2. Use the search function
-
The search bar is present on each page of Corada. There are 3 main search types when using this function: by keyword or phrase, by section number or a full-text search. Corada defaults to search by both keyword and section numbers. When you begin typing a keyword or section number, the system automatically populates a list of possible content matches. When searching by keywords or phrases, we’ve also programmed in synonyms to ensure content may be found by a wide range of users.
-
Once a keyword, phrase or section number is selected, the system conducts the search. You will notice, the results are delivered in an organized way, by content type. You can click to expand the categories individually or, expand or collapse them all at once. Within the results are Related Keywords that will initiate a new search when clicked.
-
If your search garners no results as a keyword or section number, you are then offered a full text search.
-
If you would like to edit the search criteria or conduct a more advanced search, you can do so by expanding the search options in the Search Bar. You can filter by information type, media type; change your search type, or change the sort order of your results.
3. COMING SOON! Browse by Keyword. This new and exciting feature will allow users to browse an alphabetical list of thousands of keywords and display all content related to the selected keyword.
FAQ: How do I access the 2010 ADA Standards?
To access the 2010 ADA Standards:
1. From the home page, click on the "2010 ADA Standards" button in the top navigation or click here. This will take you to a page where you can browse the chapters of the Standards. On this page:
-
You may browse the chapters and sections of the 2010 ADA Standards.
-
You may conduct a keyword, section number or full-text search of only the Standards.
-
You have the option to buy a printed (spiral-bound) or PDF copy of the Pocket Guide to the 2010 ADA Standards, edited by Evan Terry Associates and distributed by the International Code Council (ICC). The PDF version is available for immediate download; and each section is hyperlinked directly to the corresponding section in Corada for instant access to more information about every section of the Standards! Plus, the PDF version is mobile friendly and compatible with all devices.
2. From the home page, you may conduct a keyword, section number or full-text search using the search bar in the top navigation. Once the search results are delivered, click to expand "Official Federal Documents" then "Standards" to see what results are returned for the 2010 ADA Standards.
FAQ: Why is some of Corada’s content gray and not clickable?
This means that content is not available at your current subscription level. Please review the subscription levels and their benefits on the Access Levels page. To view more content, you may upgrade your account at anytime!
FAQ: How do I bookmark content?
To bookmark content:
Watch: How to Bookmark Content

1. Login to Corada.
2. Click on the "Bookmark Page" button when you are on any Corada content.
3. Select where you want to the bookmark to be saved. For example, you can save it to "My Bookmarks" or a WorkGroup of which you are a member.
FAQ: How do I access My Bookmarks?
To access My Bookmarks:
1. Login to Corada.
2. Go to My Account.
3. Click on "My Bookmarks."
-
This will open your personal bookmarks page where you can share a bookmarked item or delete a bookmark.
FAQ: How do I share content?
To share content:
Watch: How to Share Content

1. Click on the "Share Page" button on any page in Corada.
2. Select from the dialog box how you would like to share it
-
You may share via the social networks shown in the icons, email it using the envelope icon, or simply copy the URL in the grey box.
3. Click "OK."
FAQ: Does the content go through a Quality Control process?
Yes. All content in Corada, including images, products from external websites, links to external websites, and videos, goes through extensive quality control (QC) processes, including review by at least one of ETA’s technical experts. We take pride in delivering quality information. If you find an errors, oversights or omissions, please Contact Us.
FAQ: How do I suggest content for Corada?
We encourage you to reach out to us and tell us what you would like to see in Corada!
To suggest content, you may either:
1. Click on the "Feedback or Help" button that appears on every page of Corada.
2. Contact us via email.
FAQ: What is Corada Voices?
Corada Voices is an interactive place for users to discuss, share, collaborate and learn about accessibility.

Watch: What is Corada Voices?
-
Registered Users may browse and read topic threads.
-
Premium Users may also compose a comment, pose a question, write a product review, or upload ADA fails, possible solutions, and design ideas.
-
Accessibility Specialists may also craft professional Interpretations or Opinions for their own use, public viewing, just for other Corada Accessibility Specialists or for a specific WorkGroup(s). They can also reply to the "Ask A Specialist" feature (coming soon!).
FAQ: How do I create a new post in Corada Voices?
To create a new post in Corada Voices:

1. Login to Corada and from the home page, click on "VOICES."
2. Click on "Compose a New Post."
3. Choose the category that best fits your post, and the correct form will open.
4. Complete each field on the form. Required fields are marked with an asterisk (*):
-
Title your post and fill in the Content field, utilizing standard editing tools if needed.
-
Add ADA reference(s) relevant to your post. (Why?)
-
Add keyword(s) relevant to your post. (Why?)
5. You may chose to post anonymously by clicking on the YES/NO toggle.
6. You may set privacy settings for your post by choosing one of the following from the menu:
-
"Everyone" - general public
-
"Only Me" - for your use only (for example, to make notes to yourself or to save this post as a draft for future edits before publishing)
-
"Only Users with Accessibility Specialist level" - only viewable to those with an Accessibility Specialist subscription
-
"Selected WorkGroup(s)" - this will make your post viewable to only the WorkGroup(s) you select. Click "Add WorkGroup" and select from the list of WorkGroups of which you are a member. Repeat this step as needed to select all the WorkGroups desired.
7. You may also attach images or files by selecting the “Add file” link, near the bottom of the form. Repeat this step as needed to add desired files.
8. When ready, click the blue “Submit” button.
FAQ: How do I reply to a post in Corada Voices?
To reply to a post in Corada Voices:
1. Click on the title of the post to open it.
2. Click on the blue “REPLY” button.
3. Choose the category that best fits your intended reply, and the correct "New Post" form will open.
4. Complete each field on the form. Required fields are marked with an asterisk (*):
-
Title your post and fill in the Content field, utilizing standard editing tools if needed.
-
For your convenience, any ADA references associated with the original post will automatically be included as ADA references for your reply. However, you may remove these by clicking on the "x" on each tag. Click here for how to add ADA reference(s) relevant to your post. (Why?)
-
For your convenience, any keywords associated with the original post will automatically be included in your reply. However, you may remove these by clicking on the "x" on each tag. Click here for how to add keyword(s) relevant to your post. (Why?)
5. You may chose to post anonymously by clicking on the YES/NO toggle.
6. You may set privacy settings for your post by choosing one of the following from the menu:
-
"Everyone" - general public
-
"Only Me" - for your use only (for example, to make notes to yourself or to save this post as a draft for future edits before publishing)
-
"Only Users with Accessibility Specialist level" - only viewable to those with an Accessibility Specialist subscription
-
"Selected WorkGroup(s)" - this will make your post viewable to only the WorkGroup(s) you select. Click "Add WorkGroup" and select from the list of WorkGroups of which you are a member. Repeat this step as needed to select all the WorkGroups desired.
7. You may also attach images or files by selecting the “Add file” link, near the bottom of the form. Repeat this step as needed to add desired files.
8. When ready, click the blue “Submit” button.
FAQ: How do I delete a Voices post?
To delete a Voices post:
1. Login to Corada and click on VOICES.
2. Locate your post and click the title to open it.
3. Click on the cog wheel in the upper right corner of the post and click "Delete post."
4. Click "OK" when prompted: "Are you sure you want to delete this post?"
FAQ: Why should I enter ADA references in my Voices post?
When you enter relevant ADA references in your Voices post, the post is integrated with Corada’s existing database of other accessibility-related material, so your question, comment, Opinion or Interpretation will be in context with applicable federal standards, regulations, technical assistance materials and all of the other relevant content on Corada. For example, if you comment about carpet pile height and tag it with ADAS section 302.2 and ADA Title III regulation 36.304(b)(20), when other users search these sections, they will see your comment (if applicable, per your privacy settings for the post).
Connecting user posts with existing content requires "tagging" them with applicable ADA references and keywords so that like materials will find each other in the system.
-
Not sure what reference to use? Click here to browse the 2010 ADA Standards (coming soon!)
FAQ: How do I enter ADA references in my Voices post?
To enter ADA references in your Voices post:
1. While composing a new post or a reply, find the "ADA references" field.
2. Begin to type a section number relevant to your post, for example "308.3" or the section name, for example "side reach." When the reference options are displayed, click on "308.3 Side Reach." Repeat this process until all applicable/desired references are entered.
-
This is not a required field and you may leave it blank. However, in order for your uploaded content to be integrated with Corada’s existing database of other accessibility-related material, it must have at least one ADA reference and one keyword to pull in other relevant information such as documents, products, how-to videos, expert opinions, design ideas, possible solutions, training opportunities, Voices discussions, links, and upcoming events.
-
Read FAQ: Why should I enter ADA references in my Voices post?
FAQ: Why should I enter keywords in my Voices post?
When you enter relevant keywords in your Voices post, the post is integrated with Corada’s existing database of other accessibility-related material, so your question, comment, Opinion or Interpretation will be in context with applicable federal standards, regulations, technical assistance materials and all of the other relevant content on Corada. For example, if you comment about carpet pile height and tag it with the keyword "Carpet," when other users search this keyword, they will see your post (if applicable, per your privacy settings for the post).
Connecting user posts with existing content requires "tagging" them with applicable ADA references and keywords so that like materials will find each other in the system.
-
Not sure what keyword to use? Click here to browse Corada's list of keywords (coming soon!)
FAQ: How do I enter keywords in my Voices post?
To enter keywords in your Voices post:
1. While composing a new post or a reply, find the "Keywords" field.
2. Begin to type a keyword or phrase like "side reach" or "public right-of-way." When the keyword options are displayed, select the desired keyword. Repeat this process until all applicable/desired keywords are entered.
-
This is not a required field and you may leave it blank. However, in order for your uploaded content to be integrated with Corada’s existing database of other accessibility-related material, it must have at least one ADA reference and one keyword to pull in other relevant information such as documents, products, how-to videos, expert opinions, design ideas, possible solutions, training opportunities, Voices discussions, links, and upcoming events.
FAQ: What are the "thumbs up" and "thumbs down" icons on Voices posts?
The "thumbs up" and "thumbs down" icons are used for voting on a post's Accuracy and Helpfulness. Just click on the appropriate icon(s) at the bottom of each post to vote.
FAQ: How do I report inappropriate Voices content to the Admin?
If you see offensive, vulgar or otherwise inappropriate comments or spam, you may report this immediately to Corada Admin by clicking on the cog wheel in the upper right corner of the post box. This will notify Corada Admin to conduct a review and remove the post from public view.
General Questions about Corada WorkSpace
FAQ: What is "Corada WorkSpace?"
Working in access-related fields, we all have lots of information that we constantly use to be effective in our work. This includes documents, product information, videos, training materials, manuals, design templates, details, specifications, links to other resources, interpretations, memos, reports - - and much more. This data is typically scattered in many places; throughout our job files, perhaps even stacked up on our desks, in our cars, on the jobsite, or saved to our computer’s desktop or browser.
Watch: What is Corada WorkSpace?

The idea behind Corada WorkSpace is to provide a private, online place within Corada, where users can upload, consolidate, organize and maintain your own accessibility-related information. Loading this data into Corada allows it to be integrated with Corada’s existing database of other accessibility-related material, so users’ content will be in context with applicable federal standards, regulations, technical assistance materials and all of the other relevant content on Corada.
Once you are logged into Corada and on the home page, click the “Corada WorkSpace” button. Here, you will see “My Content,” “My Bookmarks,” “My Voices Posts,” “My WorkGroups” and "My Storage Space." “My Content” allows users to upload virtually any content. Users can add relevant keywords and ADA references to this content to instantly see all existing Corada content matching those same tags. Though user-uploaded content is integrated into Corada’s existing content (and also Corada’s search results), it can be marked so that it can ONLY be seen by the user who entered it and the WorkGroup members they allow to see it. It is kept completely confidential, unless a user decides to share it. Users may choose to share their content by email, to social media outlets, with other Corada users, with a WorkGroup or make it public to all of Corada users. For more information about entering content, please watch the video entitled “How to Enter Content into your Corada WorkSpace" (coming soon!).
Our hope in creating Corada WorkSpace and WorkGroups is that allowing our users to integrate their private content with Corada’s content will allow them to more quickly find all of the relevant information they need to understand and comply with their obligations under the ADA.
Note: This feature is available to Premium- and Accessibility Specialist-level subscribers only. Need to upgrade your subscription? Click here!
FAQ: What are "My Bookmarks?"
“My Bookmarks” are where users' bookmarked content is stored. This feature allows users to view and manage all bookmarked content, whether personal or for a WorkGroup. From here, you may view, edit, add a note, share or remove a bookmark.
Once you are logged into Corada and on the home page, "My Bookmarks" may be access two ways:
1. By clicking on "My Account" and then on "My Bookmarks;" or
2. By clicking on "My WorkSpace" and then expanding "My Bookmarks."
Note: This feature is available to Premium- and Accessibility Specialist-level subscribers only. Need to upgrade your subscription? Click here!
FAQ: What are "My Posts?"
“My Posts” shows users all of their posts in Corada Voices. From here, you may view or edit your posts.
Once you are logged into Corada and on the home page, "My Posts" may be access two ways:
1. By clicking on "My Account" and then on "My Posts;" or
2. By clicking on "My WorkSpace" and then expanding "My Voices Posts."
Note: This feature is available to Premium- and Accessibility Specialist-level subscribers only. Need to upgrade your subscription? Click here!
FAQ: What are "My WorkGroups?"
“My WorkGroups” allows users to view, edit, create and manage their WorkGroups. From here, users may create a WorkGroup to use individually; or, users can invite staff, project team members, colleagues, and clients to join and collaborate. Premium-level subscribers may create up to 3 WorkGroups and Accessibility Specialist-level subscribers may create up to 12 WorkGroups. Coming soon, users will also be able to add even more WorkGroups for a nominal fee.
Watch: “What are Corada WorkGroups?” (coming soon!)

Once you are logged into Corada and on the home page, "My WorkGroups" may be access two ways:
1.By clicking on "My Account" and then on "My WorkGroups;" or
2. By clicking on "My WorkSpace" and then expanding "My WorkGroups."
Note: This feature is available to Premium- and Accessibility Specialist-level subscribers only. Need to upgrade your subscription? Click here!
FAQ: What is "My Storage Space?"
“My Storage Space” allows users to view their used and available online storage space in their WorkSpace. Premium-level subscribers may store up to 2GB and Accessibility Specialist-level subscribers may store up to 5GB. Coming soon, users will also be able to purchase additional storage space, for a nominal fee.
Watch: “What is Corada WorkSpace?” (coming soon!)

Once you are logged into Corada and on the home page, click on "My WorkSpace" at the top of the page. Scroll down to "My Storage Space" and expand the category to view your available space.
Entering Content in Corada WorkSpace
FAQ: How do I enter a New Document in my Corada WorkSpace?
To enter a new document in your WorkSpace (once you are logged in):
1. Click on 'My WorkSpace' at the top of the home page - this will take you to your WorkSpace home page.
2. Click on '+ My Content' to expand and select the 'Add Content' link that you will see at the bottom of this expanded section.
3. Select 'New Document' from the menu items. This will open the data entry fields. Note that all fields marked with an asterisk (*) are required fields.
-
'Name' - Enter the name of the document as named by author or publisher.
-
'Source' - This should be the source of the document; who authored it/where it came from. For example: U.S. Department of Justice.
-
'Source Date' - The publication date, as found in the document. Be sure to look on a title page or at the end of the document. A drop-down calendar will allow you to choose a date or you may manually type in the date in the YYYY-MM-DD format.
-
'Source date specificity' - This refers to how you want to display the publication date. For example, some documents only give you the month and year as a publication date, like "March 2003." In this case, under Source date, you would enter 2003-03-01 and then under Source date specificity, you would select "Year/Month." Likewise, if the document only provides the publication year, for example 2003, then under Source date, you would enter 2003-01-01 and under Source date specificity, you would select "Year."
-
'Source location' - If your document/source came from a website, enter the URL here, or enter any source location notes in this field if no URL.
-
'Document wide message' - This will display a message that will automatically be placed on every piece of the document, in bright red. This is used in rare cases where we need to alert users to something, such as ____
-
Click the blue 'Save Document' button - you have now created the base of your Document. The window now presented to you gives you options to make your entry Live, set permissions and privacy, and assign a different owner if needed.
-
Making your entry Live: Best practice would be to click the blue 'Preview' button to check that your entry is complete and functioning before making it live. When you are satisfied with your entry use the toggle button and change it to 'YES'. Otherwise, the entry is viewable to only you, and remains in 'Draft' mode.
-
If you need to make edits to your entry, click the blue 'Edit' button next to your entry's title.
-
-
Changing the privacy of your entry: Your entry defaults to "Not visible to the public". Adjust this setting by clicking the blue 'Edit' button to the right. Use the toggle button to change to 'YES', confirm when the dialog box opens, and click on the blue 'Update Privacy' button.
-
Note: by changing the toggle button to 'YES,' you will allow ALL Corada users, the general public and search engines access to view and index your content. If your content should be kept private or confidential, the toggle button should remain on 'NO' so it will NOT be visible to the public.
-
-
Changing the permissions of your entry: Your entry defaults to only giving you permission to view, edit and manage your content. To allow other users or WorkGroups to view, edit or manage your content, click on the blue 'Edit' button to the right. Read what permissions you may choose from and then select specific users or WorkGroups by clicking on the 'Add...' link.
-
'User Permissions': Choose the user from the drop-down menu, then assign what type of permission you are giving that user (View, Edit, Manage). You may assign more than one user if needed. Remove any user permissions by clicking the 'Remove' link to the right of their name.
-
'WorkGroup Permissions': Choose a WorkGroup from the drop-down menu, then assign what type of permission you are giving that WorkGroup (View, Edit, Manage). You may assign more than one WorkGroup permissions for your entry as needed. Remove any WorkGroup permissions by clicking the 'Remove' link to the right of their name.
-
Click the blue 'Update Permissions' button at the bottom to complete assigning permissions for your entry.
-
-
Changing the owner of your entry: Since you entered the content, you are the "owner" of your entry. If you wish to transfer ownership, click the blue 'Edit' button to the right and choose a user's name from the drop-down menu. Click the blue 'Update Owner' button to complete.
4. Next, you will build the "clips", or small pieces of the Document. Our data entry staff always practices a copy/paste method when clipping a document to help ensure that the text is in its original state, and we strongly suggest that you practice this as well. Click the blue 'View/Manage Sections' button to begin.
-
Click the blue 'Add Section' button. The window presented will be where you input the information for one clip. A clip may consist of a chapter of your document (ex. - Chapter 3 Toilet Rooms), a subsection (ex. - 604.2.2), or other definable part of the document.
-
'Name' - This should match your source document. Examples include: CHAPTER 1: APPLICATION AND ADMINISTRATION; 202.1 General; Subpart D -- New Construction and Alterations
-
'Section Number' - Applicable if the document you are inputting lists section numbers.
-
'Content' Tab - This is where you will paste in the body of text from your source document. We have provided standard formatting tools and suggest adjusting your clip so that it matches the source material as closely as possible.
-
'Images' Tab - Upload images or drawings that need to be integrated into your text for this clip. Click on the blue 'Add Image' link.
-
Click the 'Add Image' link, click the grey 'Choose File' button to open a dialog box. Select your saved image from the appropriate folder and click 'Open'.
-
'Name' - We suggest naming your image the same as what your source material identifies it as. If there is no name listed, name it something identifiable.
-
'Alt text' - Reference this document from the Social Security Administration for guidance on composing ALT text.
-
'Sort order' - an optional field, useful if you are using multiple images and wish for them to appear in a particular order. Number your images sequentially from 1.
-
You may continue to upload images one at a time as needed by clicking the 'Add Image' link.
-
Important: To have your image placed within the text properly, go back to the Content Tab. In the body of the text, where the image should go, paste in the image convention: [% image(name || size || position) %]
-
name should be the name you've given the image. Example above: "logo" or "figure 202.5"
-
size should be the size you want it - 100% or smaller? Use: 100, 75, 66, 50, 42, 33, 25, actual_size
-
position should be left, center or right
-
example: [% image(logo || 50 || center) %]
Note: at the bottom of the content tab are hints/tips for the image convention.
-
-
-
When all tabs are completed, you have the opportunity to provide ADA References and Keywords in the fields located below the blue-outlined box.
-
'ADA References' - Enter ADA sections or subsection numbers if applicable to your content. (ex. - 308.3) When you click on the field, begin typing. This is an auto-fill field and you will be able to choose from the options that drop down. Use the scroll bar to find the section/subsection of the appropriate reference document that you wish to reference. You may choose multiple reference documents (ex. - 308.3 in the 2010 ADA Standards for Accessible Design Pocket Guide and 308.3 in the 2012 Florida Accessibility Code for Building Construction Pocket Guide).
Read: "Why enter ADA references?"
-
'Keywords' - This field is also an auto-fill field and will begin to populate a drop-down menu as you type. Please select all applicable keywords. * You may not create your own keywords at this time. If you believe that we are missing a keyword that should be included, please contact us.
Read: "Why enter keywords?"
-
-
Click the blue 'Save Clip' button at the bottom of your page. Your clip is now saved and the window presented is a preview of your clip. Make any changes necessary by clicking the blue 'Edit' button.
5. To add additional clips: As you build your document you will see the document tree above the title/name of the clip you are working or or just saved. Click back in the tree to 'View/Manage Sections'. You will now see the clips you have input and can add additional sections by clicking the blue 'Add Section' button. Repeat the process above.
FAQ: How do I enter a New Product or Service in my Corada WorkSpace?
To enter a new product or service in your WorkSpace (once you are logged in):
1. Click on 'My WorkSpace' at the top of the home page - this will take you to your WorkSpace home page.
2. Click on '+ My Content' to expand and select the 'Add Content' link that you will see at the bottom of this expanded section.
3. Select 'New Product or Service' from the menu items. This will open the data entry fields. Note that all fields marked with an asterisk (*) are required fields.
-
'Name' - Enter the name and manufacturer if entering a product or the company/organization if entering a service. Here are some helpful hints when entering a product's name:
-
Name the product exactly as it appears on the manufacturer’s website.
-
When a descriptive product name is not provided by the manufacturer, then use this naming convention: Manufacturer Name, then Full Product name, including product number if applicable. For example: Bobrick 18" Straight Grab Bar B-5806 x 18. If a manufacturer displays their product name with a ® or TM you want to ensure you KEEP those symbols when you copy/paste the name. For example: Kohler Soho® Lavatory Model K-2053.
-
-
You will see the blue-outlined box with several tabs. We will look at each tab below:
-
'Description' - This is where you will paste in the product description, features, etc., copied directly from the manufacturer’s website. We always recommend copy/paste when entering data/information that you did not compose.
-
'Images' - This is where you will attach a product image(s). We suggest copying or downloading directly from the manufacturer's website. For best results, choose images that are free of text and of high-quality.
-
Click the 'Add Image' link, click the grey 'Choose File' button to open a dialog box. Select your saved image from the appropriate folder and click 'Open'.
-
'Name' - We suggest naming your image here the same as the product name. Add numbers if you have multiple images.
-
'Alt text' - Reference this document from the Social Security Administration for guidance on composing ALT text.
-
'Sort order' - an optional field, useful if you are using multiple images and wish for them to appear in a particular order. Number your images sequentially from 1.
-
You may continue to upload images one at a time as needed by clicking the 'Add Image' link.
-
-
'General Info' - Here you may enter CSI Division information, if known.
-
'Product Info'
-
'Product Link' - Paste a hyperlink directly to the manufacturer's page for the product you are entering.
-
'Manufacturer's Brochure Link' - Paste a hyperlink that goes to the manufacturer's product brochure or literature download page.
-
'Manufacturer's Compliance Claim' - This will be a statement by the manufacturer on how or why their product is ADA compliant, accessible, or good for use by persons with disabilities. Copy/paste the specific compliance claim from the product description or wherever you see this. It can also be a code reference, such as, “conforms to Section 202.2 of the ADA”. Sometimes this may simply be the presence of an ISA, so if this is the case, type “ISA on product page” or something to that effect. Leave this field blank if you do not find something explicit. Do not make this up or create this yourself.
-
'Link to Product Cut Sheet, Specs or Demo' - This is a page(s) that shows detailed information regarding the product, such as critical dimensions, material composition, load capacities, testing information, installation recommendations, additional features of the product and diagrams or drawings. Sometimes this will take some research around the manufacturer’s website to find. Often it will be a PDF, so be sure to open the document in your browser and copy/paste that URL into this field, rather than downloading the document.
-
-
'Compliance Review' - You have the opportunity to review the product or service that you are entering. We have designed statements of Product compliance for you to choose from, Disability type (the type of disability this product/service assists with), and Product application. The 'Internal Notes/Interpretation field allows you to make notes or comments that will NOT be visible to the public.
-
-
When all tabs are completed, you have the opportunity to provide ADA References and Keywords in the fields located below the blue-outlined box.
-
'ADA References' - Enter ADA sections or subsection numbers if applicable to your content. (ex. - 308.3) When you click on the field, begin typing. This is an auto-fill field and you will be able to choose from the options that drop down. Use the scroll bar to find the section/subsection of the appropriate reference document that you wish to reference. You may choose multiple reference documents (ex. - 308.3 in the 2010 ADA Standards for Accessible Design Pocket Guide and 308.3 in the 2012 Florida Accessibility Code for Building Construction Pocket Guide).
Read: "Why enter ADA references?"
-
'Keywords' - This field is also an auto-fill field and will begin to populate a drop-down menu as you type. Please select all applicable keywords. * You may not create your own keywords at this time. If you believe that we are missing a keyword that should be included, please contact us.
Read: "Why enter keywords?"
-
4. Click the blue 'Save Product or Service' button at the bottom of the page to create your entry.
5. Your entry is now saved. The window now presented to you gives you options to make your entry Live, set permissions and privacy, and assign a different owner if needed.
-
Making your entry Live: Best practice would be to click the blue 'Preview' button to check that your entry is complete and functioning before making it live. When you are satisfied with your entry use the toggle button and change it to 'YES'. Otherwise, the entry is viewable to only you, and remains in 'Draft' mode.
-
If you need to make edits to your entry, click the blue 'Edit' button next to your entry's title.
6. Changing the privacy of your entry: Your entry defaults to "Not visible to the public". Adjust this setting by clicking the blue 'Edit' button to the right. Use the toggle button to change to 'YES', confirm when the dialog box opens, and click on the blue 'Update Privacy' button.
-
Note: by changing the toggle button to 'YES,' you will allow ALL Corada users, the general public and search engines access to view and index your content. If your content should be kept private or confidential, the toggle button should remain on 'NO' so it will NOT be visible to the public.
7. Changing the permissions of your entry: Your entry defaults to only giving you permission to view, edit and manage your content. To allow other users or WorkGroups to view, edit or manage your content, click on the blue 'Edit' button to the right. Read what permissions you may choose from and then select specific users or WorkGroups by clicking on the 'Add...' link.
-
'User Permissions': Choose the user from the drop-down menu, then assign what type of permission you are giving that user (View, Edit, Manage). You may assign more than one user if needed. Remove any user permissions by clicking the 'Remove' link to the right of their name.
-
'WorkGroup Permissions': Choose a WorkGroup from the drop-down menu, then assign what type of permission you are giving that WorkGroup (View, Edit, Manage). You may assign more than one WorkGroup permissions for your entry as needed. Remove any WorkGroup permissions by clicking the 'Remove' link to the right of their name.
-
Click the blue 'Update Permissions' button at the bottom to complete assigning permissions for your entry.
8. Changing the owner of your entry: Since you entered the content, you are the "owner" of your entry. If you wish to transfer ownership, click the blue 'Edit' button to the right and choose a user's name from the drop-down menu. Click the blue 'Update Owner' button to complete.
FAQ: How do I enter a New Video in my Corada WorkSpace?
To enter a new video in your WorkSpace (once you are logged in):
1. Click on 'My WorkSpace' at the top of the home page - this will take you to your WorkSpace home page.
2. Click on '+ My Content' to expand and select the 'Add Content' link that you will see at the bottom of this expanded section.
3. Select 'New Video' from the menu items. This will open the data entry fields. Note that all fields marked with an asterisk (*) are required fields.
-
'Title' - Give the video you are entering a good, informative title. In most cases, you will want to copy and paste what the product manufacturer, company or organization has already titled the video. Unless it will not make sense to our users. For example, we had a video in our data entry titled "6550 setup." That is not at all informative. When edited, it became "Detecto Wheelchair Scale 6550 Setup" which is much more informative, but retained a portion of the original title.
-
'Host' - Choose from YouTube or Vimeo (At this time, the Corada video player only supports hyperlinks from YouTube or Vimeo.) DO NOT copy a URL for a link to a video on the manufacturer's site, only from YouTube or Vimeo; otherwise it will ERROR on Corada.
-
'Video url' - Enter the url for the Youtube or Vimeo video ("e.g. https://youtube.com/..."). Note: if the video is embedded on another site, click the "Youtube" / "Vimeo" link in the bottom right corner of the player first.
-
'Duration' - Please enter the total duration of the video, in seconds.
-
'Preview Image' - This is a place to upload a preview image (aka "thumbnail" image). You will need to watch the video and take a screenshot of the video while playing, at the most relevant point of the video. Ask yourself: what preview image would be most informative to capture the essence of the video. In most cases, it may just be the opening credits/title page with an organization's logo. Use your best judgment. Convert this screenshot to a JPG and save to your computer. When ready to upload, click the grey 'Choose Image' button to open a dialog box on your computer.
-
'Video description' - This is a brief description of what the video is about. NOTE: If the product manufacturer or organization provides a video description in YouTube or Vimeo, then use their description, if provided. Do NOT compose a summary if they already provide a sufficient description. Also note that YouTube has a "SHOW MORE" button that must be selected to view the description in its entirety.
-
'ADA References' - Enter ADA sections or subsection numbers if applicable to your content. (ex. - 308.3) When you click on the field, begin typing. This is an auto-fill field and you will be able to choose from the options that drop down. Use the scroll bar to find the section/subsection of the appropriate reference document that you wish to reference. You may choose multiple reference documents (ex. - 308.3 in the 2010 ADA Standards for Accessible Design Pocket Guide and 308.3 in the 2012 Florida Accessibility Code for Building Construction Pocket Guide).
Read: "Why enter ADA references?"
-
'Keywords' - This field is also an auto-fill field and will begin to populate a drop-down menu as you type. Please select all applicable keywords. * You may not create your own keywords at this time. If you believe that we are missing a keyword that should be included, please contact us.
Read: "Why enter keywords?"
4. Click the blue 'Save Video' button at the bottom of the page to create your entry.
5. Your entry is now saved. The window now presented to you gives you options to make your entry Live, set permissions and privacy, and assign a different owner if needed.
-
Making your entry Live: Best practice would be to click the blue 'Preview' button to check that your entry is complete and functioning before making it live. When you are satisfied with your entry use the toggle button and change it to 'YES'. Otherwise, the entry is viewable to only you, and remains in 'Draft' mode.
-
If you need to make edits to your entry, click the blue 'Edit' button next to your entry's title.
6. Changing the privacy of your entry: Your entry defaults to "Not visible to the public". Adjust this setting by clicking the blue 'Edit' button to the right. Use the toggle button to change to 'YES', confirm when the dialog box opens, and click on the blue 'Update Privacy' button.
-
Note: by changing the toggle button to 'YES,' you will allow ALL Corada users, the general public and search engines access to view and index your content. If your content should be kept private or confidential, the toggle button should remain on 'NO' so it will NOT be visible to the public.
7. Changing the permissions of your entry: Your entry defaults to only giving you permission to view, edit and manage your content. To allow other users or WorkGroups to view, edit or manage your content, click on the blue 'Edit' button to the right. Read what permissions you may choose from and then select specific users or WorkGroups by clicking on the 'Add...' link.
-
'User Permissions': Choose the user from the drop-down menu, then assign what type of permission you are giving that user (View, Edit, Manage). You may assign more than one user if needed. Remove any user permissions by clicking the 'Remove' link to the right of their name.
-
'WorkGroup Permissions': Choose a WorkGroup from the drop-down menu, then assign what type of permission you are giving that WorkGroup (View, Edit, Manage). You may assign more than one WorkGroup permissions for your entry as needed. Remove any WorkGroup permissions by clicking the 'Remove' link to the right of their name.
-
Click the blue 'Update Permissions' button at the bottom to complete assigning permissions for your entry.
8. Changing the owner of your entry: Since you entered the content, you are the "owner" of your entry. If you wish to transfer ownership, click the blue 'Edit' button to the right and choose a user's name from the drop-down menu. Click the blue 'Update Owner' button to complete.
FAQ: How do I enter a New CAD/BIM File in my Corada WorkSpace?
To enter a new CAD or BIM file in your WorkSpace (once you are logged in):
1. Click on 'My WorkSpace' at the top of the home page - this will take you to your WorkSpace home page.
2. Click on '+ My Content' to expand and select the 'Add Content' link that you will see at the bottom of this expanded section.
3. Select 'New CAD/BIM File' from the menu items. This will open the data entry fields. Note that all fields marked with an asterisk (*) are required fields.
-
'Name' - Name your entry so that is briefly describes what the file is or pertains to (ex. - Ramp Side Elevation)
-
'Upload drawing file' - Click the grey Choose file button to browse your computer for the file you wish to add.
-
'Description' - Add a description or other information here. Copy and paste from a source website if applicable.
-
'Source' - This should be the relevant website or publication.
-
'View' - Click the arrow to display the drop-down menu and select which view this file is providing.
-
'Detail type' - Click the arrow to display the drop-down menu and select the type.
-
'ADA References' - Enter ADA sections or subsection numbers if applicable to your content. (ex. - 308.3) When you click on the field, begin typing. This is an auto-fill field and you will be able to choose from the options that drop down. Use the scroll bar to find the section/subsection of the appropriate reference document that you wish to reference. You may choose multiple reference documents (ex. - 308.3 in the 2010 ADA Standards for Accessible Design Pocket Guide and 308.3 in the 2012 Florida Accessibility Code for Building Construction Pocket Guide).
Read: "Why enter ADA references?"
-
'Keywords' - This field is also an auto-fill field and will begin to populate a drop-down menu as you type. Please select all applicable keywords. * You may not create your own keywords at this time. If you believe that we are missing a keyword that should be included, please contact us.
Read: "Why enter keywords?"
4. Click the blue 'Save CAD/BIM File' button to create your entry.
5. Your entry is now saved. The window now presented to you gives you options to make your entry Live, set permissions and privacy, and assign a different owner if needed.
-
Making your entry Live: Best practice would be to click the blue 'Preview' button to check that your entry is complete and functioning before making it live. When you are satisfied with your entry use the toggle button and change it to 'YES'. Otherwise, the entry is viewable to only you, and remains in 'Draft' mode.
-
If you need to make edits to your entry, click the blue 'Edit' button next to your entry's title.
6. Changing the privacy of your entry: Your entry defaults to "Not visible to the public". Adjust this setting by clicking the blue 'Edit' button to the right. Use the toggle button to change to 'YES', confirm when the dialog box opens, and click on the blue 'Update Privacy' button.
-
Note: by changing the toggle button to 'YES,' you will allow ALL Corada users, the general public and search engines access to view and index your content. If your content should be kept private or confidential, the toggle button should remain on 'NO' so it will NOT be visible to the public.
7. Changing the permissions of your entry: Your entry defaults to only giving you permission to view, edit and manage your content. To allow other users or WorkGroups to view, edit or manage your content, click on the blue 'Edit' button to the right. Read what permissions you may choose from and then select specific users or WorkGroups by clicking on the 'Add...' link.
-
'User Permissions': Choose the user from the drop-down menu, then assign what type of permission you are giving that user (View, Edit, Manage). You may assign more than one user if needed. Remove any user permissions by clicking the 'Remove' link to the right of their name.
-
'WorkGroup Permissions': Choose a WorkGroup from the drop-down menu, then assign what type of permission you are giving that WorkGroup (View, Edit, Manage). You may assign more than one WorkGroup permissions for your entry as needed. Remove any WorkGroup permissions by clicking the 'Remove' link to the right of their name.
-
Click the blue 'Update Permissions' button at the bottom to complete assigning permissions for your entry.
8. Changing the owner of your entry: Since you entered the content, you are the "owner" of your entry. If you wish to transfer ownership, click the blue 'Edit' button to the right and choose a user's name from the drop-down menu. Click the blue 'Update Owner' button to complete.
FAQ: How do I enter a New Link in my Corada WorkSpace?
To enter a new link in your WorkSpace (once you are logged in):
1. Click on 'My WorkSpace' at the top of the home page - this will take you to your WorkSpace home page.
2. Click on '+ My Content' to expand and select the 'Add Content' link that you will see at the bottom of this expanded section.
3. Select 'New Link' from the menu items. This will open the data entry fields. Note that all fields marked with an asterisk (*) are required fields.
-
'Title' - Name your link something recognizable. This should be the title of the website, resource, or item you are entering.
-
'External url' - Best practice is to copy/paste the full URL directly from the website you are linking to. If this is a document or other item that you are inputting, this should be a link that directly opens the document or points to the specific item you are highlighting in this entry.
-
'Description' - When applicable, copy/paste the website's "About Us" description. If this is a document or other item, you may compose a brief description or synopsis.
-
'Images' - You may choose to upload logos or other pertinent images. Click on the 'Add Image' link.
-
Click the grey 'Choose File' button to open a dialog box. Select your saved image from the appropriate folder and click 'Open'.
-
'Name' - you must name your image (ex.: ADA Association logo)
-
'Alt text' - Reference this document from the Social Security Administration for guidance on composing ALT text.
-
'Sort order' - an optional field, useful if you are using multiple images and wish for them to appear in a particular order. Number your images sequentially from 1.
-
You may continue to upload images one at a time as needed by clicking the 'Add Image' link.
-
-
'ADA References' - Enter ADA sections or subsection numbers if applicable to your content. (ex. - 308.3) When you click on the field, begin typing. This is an auto-fill field and you will be able to choose from the options that drop down. Use the scroll bar to find the section/subsection of the appropriate reference document that you wish to reference. You may choose multiple reference documents (ex. - 308.3 in the 2010 ADA Standards for Accessible Design Pocket Guide and 308.3 in the 2012 Florida Accessibility Code for Building Construction Pocket Guide).
-
'Keywords' - This field is also an auto-fill field and will begin to populate a drop-down menu as you type. Please select all applicable keywords. * You may not create your own keywords at this time. If you believe that we are missing a keyword that should be included, please contact us.
4. Click the blue 'Save Link' button at the bottom of the page to create your entry.
5. Your entry is now saved. The window now presented to you gives you options to make your entry Live, set permissions and privacy, and assign a different owner if needed.
-
Making your entry Live: Best practice would be to click the blue 'Preview' button to check that your entry is complete and functioning before making it live. When you are satisfied with your entry use the toggle button and change it to 'YES'. Otherwise, the entry is viewable to only you, and remains in 'Draft' mode.
-
If you need to make edits to your entry, click the blue 'Edit' button next to your entry's title.
-
6. Changing the privacy of your entry: Your entry defaults to "Not visible to the public". Adjust this setting by clicking the blue 'Edit' button to the right. Use the toggle button to change to 'YES', confirm when the dialog box opens, and click on the blue 'Update Privacy' button.
-
Note: by changing the toggle button to 'YES,' you will allow ALL Corada users, the general public and search engines access to view and index your content. If your content should be kept private or confidential, the toggle button should remain on 'NO' so it will NOT be visible to the public.
7. Changing the permissions of your entry: Your entry defaults to only giving you permission to view, edit and manage your content. To allow other users or WorkGroups to view, edit or manage your content, click on the blue 'Edit' button to the right. Read what permissions you may choose from and then select specific users or WorkGroups by clicking on the 'Add...' link.
-
'User Permissions': Choose the user from the drop-down menu, then assign what type of permission you are giving that user (View, Edit, Manage). You may assign more than one user if needed. Remove any user permissions by clicking the 'Remove' link to the right of their name.
-
'WorkGroup Permissions': Choose a WorkGroup from the drop-down menu, then assign what type of permission you are giving that WorkGroup (View, Edit, Manage). You may assign more than one WorkGroup permissions for your entry as needed. Remove any WorkGroup permissions by clicking the 'Remove' link to the right of their name.
-
Click the blue 'Update Permissions' button at the bottom to complete assigning permissions for your entry.
8. Changing the owner of your entry: Since you entered the content, you are the "owner" of your entry. If you wish to transfer ownership, click the blue 'Edit' button to the right and choose a user's name from the drop-down menu. Click the blue 'Update Owner' button to complete.
FAQ: How do I enter a New Event in my Corada WorkSpace?
To enter a new event in your WorkSpace (once you are logged in):
1. Click on 'My WorkSpace' at the top of the home page - this will take you to your WorkSpace home page.
2. Click on '+ My Content' to expand and select the 'Add Content' link that you will see at the bottom of this expanded section.
3. Select 'New Event' from the menu items. This will open the data entry fields. Note that all fields marked with an asterisk (*) are required fields.
-
'Name' - This should be the title of the event as listed in your source.
-
'Description' Tab - If applicable, we suggest copying and pasting the event's info page here. Otherwise, compose a brief synopsis of the event you are entering.
-
'Images' Tab - Add the event's or organizer's logo or other relevant photographs here.
-
Click the 'Add Image' link, click the grey 'Choose File' button to open a dialog box. Select your saved image from the appropriate folder and click 'Open'.
-
'Name' - We suggest naming your image the same as what your source material identifies it as. If there is no name listed, name it something identifiable.
-
'Alt text' - Reference this document from the Social Security Administration for guidance on composing ALT text.
-
'Sort order' - an optional field, useful if you are using multiple images and wish for them to appear in a particular order. Number your images sequentially from 1.
-
You may continue to upload images one at a time as needed by clicking the 'Add Image' link.
-
-
'Details' Tab - Put your cursor in the "From" field and a mini-Calendar and time will appear. Choose the event's START date and time.
-
Note: use military time when entering a start time (i.e., 1:00 PM should be entered as 13:00, etc.)
-
You must also enter the time that you are physically in, as explained in the note under the From field.
-
This is the trickiest part of Calendar entry! It's easy to accidentally make a mistake with this. So, please DOUBLE check your work. It's very easy to Preview the entry to ensure it's the correct date, time and time zone.
-
Is the event all day? If so, click the "All Day?" check box. For example, you will use this for events that only say "May 12-15th" but do not provide a start/end time.
-
Does the event provide an end time? If so, check the "Include end date/time" check box. Note: this will then allow you to edit the "From" field to add in an end time/date.
-
'Event time zone' - Select the timezone you would like the event to be shown in (e.g. "selecting PST will ensure that an event at 8:00AM PST will always be shown as "8:00AM PST"), or leave blank to display event in end users' timezone (e.g. an event at 8:00AM PST will be displayed as "8:00AM PST" to an user in PST, and "10:00AM CST" to an user in CST)
-
'Registration Start' and 'Registration End' fields - If your event requires registration and also provides dates, enter those here.
-
'Organization' - Paste in the name of the organization hosting or presenting this event.
-
'Contact Name' - enter the name of the organizer and/or contact person, if provided.
-
'Venue' - This is the name of the location or where the event is being held, if provided. For example: Hyatt Regency Hotel or Evan Terry Associates. Note: if your event is online please leave this field blank.
-
'Address fields' - Paste in the Venue's address in the appropriate fields. Note: Use the 2-digit postal abbreviation for each state. For example: use "AL" instead of "Alabama." Do not enter the Zip Code.
-
'Manual Google Maps link' - If your event has a location/venue, then follow these steps: Open up a new window in your browser. Go to www.google.com. Paste in the name of the Venue or the address (for this example, I searched for "Hyatt Regency Atlanta." Click on Maps, the copy that Google Maps URL and paste into this field.
-
'Event website' - Copy and paste the event's website URL here, if there is one.
-
'Organization website' - Copy and paste the website URL of the organization or entity who is hosting/presenting/organizing the event.
-
'Category' - We have provided several types of event categories. You may choose one or more that fit your event.
-
'Free' - Please select if your event is free or not.
-
-
'Schedule' Tab - If there is a relatively simple schedule to enter (i.e., Conference 9 am to 12 pm, Lunch 12 - 1:30 pm, Workshop 1:30 - 5:00 pm) then do so.
-
'Speakers' - If a list of Speakers are provided, then you may add them here. To input a new speaker, click "Add speaker" and input as much in the fields as you are given. You may even upload their photo, if provided.
4. When all tabs are completed, you have the opportunity to provide ADA References and Keywords in the fields located below the blue-outlined box.
-
'ADA References' - Enter ADA sections or subsection numbers if applicable to your content. (ex. - 308.3) When you click on the field, begin typing. This is an auto-fill field and you will be able to choose from the options that drop down. Use the scroll bar to find the section/subsection of the appropriate reference document that you wish to reference. You may choose multiple reference documents (ex. - 308.3 in the 2010 ADA Standards for Accessible Design Pocket Guide and 308.3 in the 2012 Florida Accessibility Code for Building Construction Pocket Guide).
Read: "Why enter ADA references?"
-
'Keywords' - This field is also an auto-fill field and will begin to populate a drop-down menu as you type. Please select all applicable keywords. * You may not create your own keywords at this time. If you believe that we are missing a keyword that should be included, please contact us.
Read: "Why enter keywords?"
4. Click the blue 'Save Event' button at the bottom of the page to create your entry.
5. Your entry is now saved. The window now presented to you gives you options to make your entry Live, set permissions and privacy, and assign a different owner if needed.
-
Making your entry Live: Best practice would be to click the blue 'Preview' button to check that your entry is complete and functioning before making it live. When you are satisfied with your entry use the toggle button and change it to 'YES'. Otherwise, the entry is viewable to only you, and remains in 'Draft' mode.
-
If you need to make edits to your entry, click the blue 'Edit' button next to your entry's title.
6. Changing the privacy of your entry: Your entry defaults to "Not visible to the public". Adjust this setting by clicking the blue 'Edit' button to the right. Use the toggle button to change to 'YES', confirm when the dialog box opens, and click on the blue 'Update Privacy' button.
-
Note: by changing the toggle button to 'YES,' you will allow ALL Corada users, the general public and search engines access to view and index your content. If your content should be kept private or confidential, the toggle button should remain on 'NO' so it will NOT be visible to the public.
7. Changing the permissions of your entry: Your entry defaults to only giving you permission to view, edit and manage your content. To allow other users or WorkGroups to view, edit or manage your content, click on the blue 'Edit' button to the right. Read what permissions you may choose from and then select specific users or WorkGroups by clicking on the 'Add...' link.
-
'User Permissions': Choose the user from the drop-down menu, then assign what type of permission you are giving that user (View, Edit, Manage). You may assign more than one user if needed. Remove any user permissions by clicking the 'Remove' link to the right of their name.
-
'WorkGroup Permissions': Choose a WorkGroup from the drop-down menu, then assign what type of permission you are giving that WorkGroup (View, Edit, Manage). You may assign more than one WorkGroup permissions for your entry as needed. Remove any WorkGroup permissions by clicking the 'Remove' link to the right of their name.
-
Click the blue 'Update Permissions' button at the bottom to complete assigning permissions for your entry.
8. Changing the owner of your entry: Since you entered the content, you are the "owner" of your entry. If you wish to transfer ownership, click the blue 'Edit' button to the right and choose a user's name from the drop-down menu. Click the blue 'Update Owner' button to complete.
FAQ: How do I enter a New Upload in my Corada WorkSpace?
To enter a new upload in your WorkSpace (once you are logged in):
1. Click on 'My WorkSpace' at the top of the home page - this will take you to your WorkSpace home page.
2. Click on '+ My Content' to expand and select the 'Add Content' link that you will see at the bottom of this expanded section.
3. Select 'New Upload' from the menu items. This will open a simple upload and Description field.
4. Click the grey Choose File button to open your computer's dialog box. Select your file or image.
5. You may compose a brief description of what you are uploading or copy and paste from a website or publication.
6. Click the blue 'Save Upload' button to create your entry.
7. Your entry is now saved. The window now presented to you gives you options to make your entry Live, set permissions and privacy, and assign a different owner if needed.
-
Making your entry Live: Best practice would be to click the blue 'Preview' button to check that your entry is complete and functioning before making it live. When you are satisfied with your entry use the toggle button and change it to 'YES'. Otherwise, the entry is viewable to only you, and remains in 'Draft' mode.
-
If you need to make edits to your entry, click the blue 'Edit' button next to your entry's title.
8. Changing the privacy of your entry: Your entry defaults to "Not visible to the public". Adjust this setting by clicking the blue 'Edit' button to the right. Use the toggle button to change to 'YES', confirm when the dialog box opens, and click on the blue 'Update Privacy' button.
-
Note: by changing the toggle button to 'YES,' you will allow ALL Corada users, the general public and search engines access to view and index your content. If your content should be kept private or confidential, the toggle button should remain on 'NO' so it will NOT be visible to the public.
9. Changing the permissions of your entry: Your entry defaults to only giving you permission to view, edit and manage your content. To allow other users or WorkGroups to view, edit or manage your content, click on the blue 'Edit' button to the right. Read what permissions you may choose from and then select specific users or WorkGroups by clicking on the 'Add...' link.
-
'User Permissions': Choose the user from the drop-down menu, then assign what type of permission you are giving that user (View, Edit, Manage). You may assign more than one user if needed. Remove any user permissions by clicking the 'Remove' link to the right of their name.
-
'WorkGroup Permissions': Choose a WorkGroup from the drop-down menu, then assign what type of permission you are giving that WorkGroup (View, Edit, Manage). You may assign more than one WorkGroup permissions for your entry as needed. Remove any WorkGroup permissions by clicking the 'Remove' link to the right of their name.
-
Click the blue 'Update Permissions' button at the bottom to complete assigning permissions for your entry.
10. Changing the owner of your entry: Since you entered the content, you are the "owner" of your entry. If you wish to transfer ownership, click the blue 'Edit' button to the right and choose a user's name from the drop-down menu. Click the blue 'Update Owner' button to complete.
FAQ: Why should I enter ADA references in the content I add to my Corada WorkSpace?
The idea behind Corada WorkSpace is to provide a private, online place within Corada, where users can upload, consolidate, organize and maintain their own accessibility-related information. Loading this data into Corada allows it to be integrated with Corada’s existing database of other accessibility-related material, so users’ content will be in context with applicable federal standards, regulations, technical assistance materials and all of the other relevant content on Corada. Connecting all of these various content types requires "tagging" them with applicable ADA references and keywords so that like materials will find each other in the system.
In the "ADA Reference" field, start to type an ADA section number; for example, 308.3. When the reference options are displayed, click on "308.3 Side Reach." Repeat this process until all applicable/desired references are entered. This is not a required field and you may leave it blank. However, in order for your uploaded content to be integrated with Corada’s existing database of other accessibility-related material, it must have at least one ADA reference and one keyword to pull in other relevant information such as documents, products, how-to videos, expert opinions, design ideas, possible solutions, training opportunities, Voices discussions, links, and upcoming events.
FAQ: Why should I enter keywords in the content I add to my Corada WorkSpace?
The idea behind Corada WorkSpace is to provide a private, online place within Corada, where users can upload, consolidate, organize and maintain their own accessibility-related information. Loading this data into Corada allows it to be integrated with Corada’s existing database of other accessibility-related material, so users’ content will be in context with applicable federal standards, regulations, technical assistance materials and all of the other relevant content on Corada. Connecting all of these various content types requires "tagging" them with applicable ADA references and keywords so that like materials will find each other in the system.
In the "Keywords" field, start to type a keyword; for example, Accessible Route. When the keyword options are displayed, click on "Accessible Route." Repeat this process until all applicable/desired keywords are entered. This is not a required field and you may leave it blank. However, in order for your uploaded content to be integrated with Corada’s existing database of other accessibility-related material, it must have at least one ADA reference and one keyword to pull in other relevant information such as documents, products, how-to videos, expert opinions, design ideas, possible solutions, training opportunities, Voices discussions, links, and upcoming events.
FAQ: What is ALT Text and why should I enter it in my uploaded images?
Alternate Text (ALT text) is a word, phrase or sentence that is inserted as an attribute in an HTML document to tell users the nature or contents of an image.
From WebAIM: "The key principle is that computers and screen readers cannot analyze an image and determine what the image presents. As developers, text must be provided to the user which presents the CONTENT and FUNCTION of the images within your web content." Click here to read more WebAIM articles about ALT text.
From the Social Security Administration: "Screen reading software is used by people who are blind or who have low vision. Screen readers can only speak text that is in the document or web page. For any non-text content, text must be added, so that alternative non-visual presentation of the information is possible." Click here to read "Social Security Administration Guide: Alternate Text for Images."
General Questions about Corada WorkGroups
FAQ: What are "Corada WorkGroups?"
This is a new and exciting feature within the Corada WorkSpace that allows users to create "WorkGroups" to use individually; or, users can invite staff, project team members, colleagues, and clients to join and collaborate. Premium-level subscribers may create up to 3 WorkGroups and Accessibility Specialist-level subscribers may create up to 12 WorkGroups. (Coming soon, users will also be able to add even more WorkGroups for a nominal fee.) But users may be a member of an unlimited number of WorkGroups.
Watch: What are Corada WorkGroups? (coming soon!)

Benefits of using Corada WorkGroups:
-
WorkGroup content is integrated with Corada’s existing database of other accessibility-related material, so users’ content will be in context with applicable federal standards, regulations, technical assistance materials and all of the other relevant content on Corada.
-
Though WorkGroup content is integrated into Corada’s existing content (and also Corada’s search results), it is ONLY seen by the members of the WorkGroup; and is kept completely confidential. Content may be marked so that it can be seen by other Corada users and the general public, however, by editing the 'privacy' settings.
-
WorkGroup content is consolidated, organized, dynamic and interactive (versus a FTP or “file dump” site).
-
If allowed by WorkGroup Admin, users may upload, tag and discuss virtually any type of content.
-
Provides easy, 24-7 online access to all project-related content and ADA information in real-time.
-
WorkGroups does not require special software or specific devices to use; and may be used from any device, anywhere with an internet connection and a browser
-
Provides instant access to relevant resources for users who don’t understand ADA obligations, how to measure, etc
-
Provides real-time communication with a project team, staff or clients, with instant updates, notifications and the ability to see all WorkGroup activity
-
Provides a consolidated, Member-only location in Corada Voices for comments and discussions, so everyone in the WorkGroup has access to and benefits from the conversation
-
WorkGroup Admins may elect to have the experienced, Corada data-entry team input content and tag with keywords and relevant ADA references for an additional fee (Contact Us!)
-
WorkGroup Admins may invite an unlimited number of people to join their WorkGroup. Those invited do not have to be a current subscriber, but will be prompted to either sign up, login, upgrade or decline if they do not wish to participate. If a WorkGroup Admin has a large number of people to invite, the Corada staff can create batch invitations using the Admin's spreadsheet of names and email addresses (Contact Us!)
-
WorkGroup Admins may independently modify settings, privacy, users, permissions and content from any device at any time (with a browser and an internet connection)
FAQ: Are Corada WorkGroups private?
Yes! Absolutely.
Though a WorkGroup's content is integrated within Corada's existing database of other accessibility-related material, only WorkGroup members may see WorkGroup-specific content and activity. Members must be invited by a WorkGroup's Owner or Admin to join. Non-members, other Corada users and the general public do NOT have access to WorkGroup content and activity.
Creating and Managing WorkGroups
FAQ: How do I create a WorkGroup in Corada?
Creating a WorkGroup in Corada is quick and easy!
Here are the steps:
1. Once logged into Corada, click on "My WorkGroups" at the top of the home page.
2. Click on "+ Create a New WorkGroup."
3. Enter a name for the WorkGroup.
4. Browse to attach a logo or image to the WorkGroup (optional).
5. Click on "YES/NO" toggles to configure the WorkGroup's settings.
6. Click the "Save WorkGroup" button.
Note: This feature is available to Premium- and Accessibility Specialist-level subscribers only. Need to upgrade your subscription? Click here!
FAQ: How many WorkGroups may I create or own?
-
Users with a Premium subscription may create or own up to 3 WorkGroups.
-
User with an Accessibility Specialist subscription may create or own up to 12 WorkGroups.
FAQ: How many WorkGroups may I join?
Users with a Premium or higher subscription may join an UNLIMITED number of WorkGroups.
FAQ: How do I invite members to join my WorkGroup?
Inviting people to join your WorkGroup in Corada is quick and easy! ANYONE may be invited to a WorkGroup, as long as they have an email address. Upon receipt of the invitation, they will be prompted to either login to accept, sign up for a Premium or Accessibility Specialist subscription, upgrade their current subscription, or decline the invitation.
Here are the steps:
1. Once logged into Corada, click "My WorkGroups" at the top of the home page.
2. Click the cog menu to the right of the name of the WorkGroup to which you would like to invite members. Select the menu option "WorkGroup Members," as shown below:
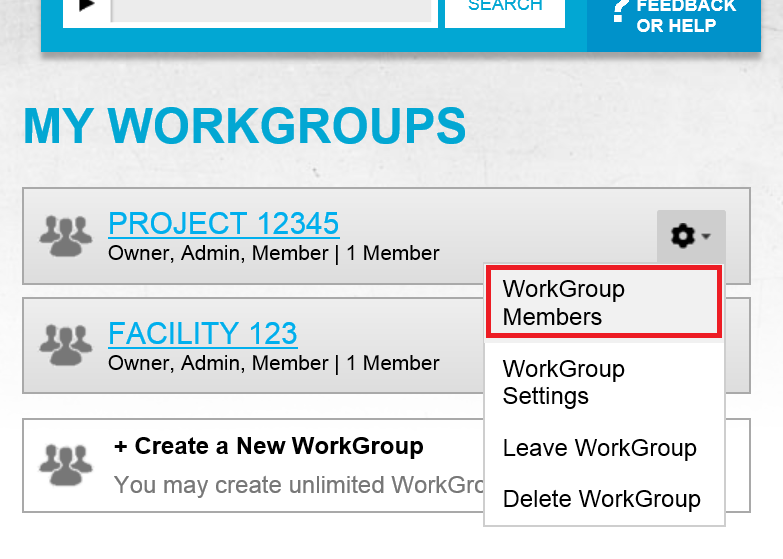
3. Click "Invite a new Member under "Pending Invitations."
4. Type or paste in the email address of the person that would like to invite. (They will receive an email with instructions for accepting, signing in, signing up, upgrading or declining the invitation).
5. Type in the person's name (optional).
6. Select the level of permission you would like to assign the user: either "Member" or "Admin." (You may edit these settings at any time, to change Members to Admins or vice versa).
-
"Admin" permissions will give a user administrative rights to the WorkGroup, including:
-
Editing the WorkGroup's name and settings
-
Inviting or removing WorkGroup members
-
Reviewing and posting content to the WorkGroup
-
7. Click the "Create Invitation" button.
8. To invite additional members, repeat the steps. You may invite an unlimited number of members to join your WorkGroup.
-
Want to invite a large number of people to join your WorkGroup? If you would like to invite a large number of people to join your WorkGroup, and would like the Corada staff to enter this information and create a "batch invitation," please Contact Us! We would be happy to upload your Excel spreadsheet of invitees and send these invitations for you!
FAQ: How do I edit my WorkGroup's settings?
1. Once logged into Corada, click on "My WorkGroups" at the top of the home page.
2. Click the cog menu to the right of the name of the WorkGroup for which you would like to edit settings. Select the menu option "WorkGroup Settings," as shown below:
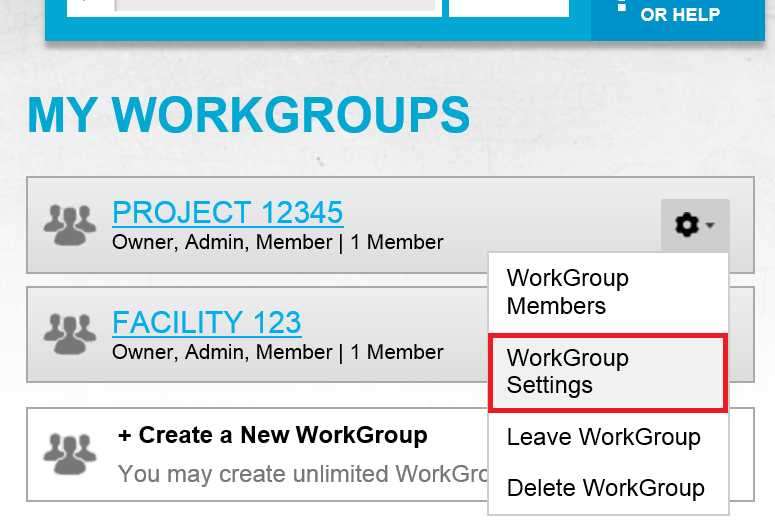
3. Click "Edit Settings."
4. Make any necessary changes.
5. Click the "Update WorkGroup" button.
FAQ: How do I place an order?
To place an order:
1. The quickest and most convenient way to place an order is to use the online Shop. Go to the Shop!
2. Other ways to place an order:
-
Ordering by phone: call (205) 972-9100, Monday - Friday, 8am - 5pm CST
-
Ordering by email: shop@Corada.com
Note: When ordering with a Purchase Order to be paid by check, please call or email us directly before proceeding with your order.
FAQ: What forms of payment are accepted?
-
Online ordering and phone orders: Shopify accepts Visa, MasterCard and American Express
-
Ordering by phone, mail or email: Evan Terry Associates accepts payment by check or purchase orders
FAQ: What shipping options do you offer?
-
Standard USPS rates or FedEx One Rate are the most common shipping methods, chosen at our discretion. Tracking information is not available if we ship via USPS.
-
For Next-Day, 2-Day, or other shipping requests, please contact our Publications Representative before placing your order so that a custom shipping charge can be added to your order.
-
Call (205) 972-9100, Monday - Friday, 8am - 5 pm CST
-
Note: Shipping charges will be added at time of purchase for online orders; and at the time of processing on faxed or phoned-in orders.
FAQ: Do you offer discounts for bulk orders?
We offer bulk discounts on certain items only. Please contact our Publications Representative for more information and to place a bulk order:
-
Phone: (205) 972-9100
-
Email: shop@Corada.com
-
Mail: ETA LLC, One Perimeter Park South, Suite 200 S, Birmingham, AL 35243
FAQ: How do I edit, cancel, check the status of, or ask a question about an order?
To contact us regarding an order, call (205) 972-9100, Monday - Friday, 8am - 5 pm CST, to speak with ETA's Publications representative.
FAQ: When will I receive my order?
We always strive to ship your order as quickly as possible! Most products ship within days of your order.
Customers will be notified of backorders and payment will be charged at the time of shipment. Please allow 5 to 10 business days for regular shipments. For overnight or 2-day shipments, call (205) 972-9100 and ask for ETA's Publications Representative.
FAQ: What is your return policy for Corada Shop items?
If you are not completely satisfied with your purchase, we will accept product returns within 30 days of your receiving them. Your only cost will be the return shipping charge. You will not be responsible for any shipping charges in the case of manufacturing defects.
FAQ: How do I return merchandise?
Return merchandise (shipping prepaid) to:
Evan Terry Associates, LLC
ATTN: Publications/ADA Department
One Perimeter Park South, Suite 200 S
Birmingham, AL 35243
Note: Shipping fees are non-refundable.
FAQ: Are there free tools available for download?
Yes! Evan Terry Associates has developed several tools to assist in accessibility surveys and plan reviews. We offer them for purchase in a durable plastic-poly stock that will hold up to the wear and tear of surveying; or as a FREE download for printing on your own. We recommend using heavy cardstock and/or laminating for durability.
FAQ: Is the Corada Shop secure and PCI Compliant?
We use Shopify to host the Corada shop. Shopify is certified Level 1 PCI DSS compliant. This compliance extends to all online stores powered by Shopify. They are very serious about securely hosting online stores and have invested significant time and money to certify their solution is PCI compliant. From annual on-site assessments validating compliance to continuous risk management, Shopify works really hard to ensure shopping cart software and ecommerce hosting is secure.
FAQ: I didn't find what I was looking for. What now?
Let us know! We will either point you to where it is in Corada, or help you find someone who has the information.
To contact us, either:
1. Click on the "FEEDBACK OR HELP" button, available on every page in Corada.
2. Contact Us via email.
FAQ: How do I leave feedback, make a suggestion or get HELP?
To leave feedback, make a suggestion or get help, you may either:
Watch: How To Leave Feedback

1. Click on the "FEEDBACK OR HELP" button that appears on every page of Corada.
-
If you are logged in as a registered user, your contact information will be automatically supplied so that we may get in touch with you regarding your problem or question. If you are not a registered user and would like to submit feedback, the system will require some basic info from you so we may contact you as needed.
-
The Feedback box will also automatically tag the page that you are viewing, but please leave descriptive comments or upload a screenshot if necessary.
2. Contact us via email.
FAQ: How do I submit an upcoming event for the Calendar?
To contact us with details of an event to add to the Calendar, you may either:
1. Click on the "FEEDBACK OR HELP" button that appears on every page of Corada.
2. Contact us via email.
FAQ: How do I submit a website for the Links page?
To contact us with details of a link to add to Links, you may either:
1. Click on the "FEEDBACK OR HELP" button that appears on every page of Corada.
2. Contact us via email.
FAQ: How do I submit a job for the Job Board?
To submit details of a job opening to add to the Job Board, you may either:
1. Click on the "FEEDBACK OR HELP" button that appears on every page of Corada.
2. Contact us via email.
FAQ: How do I follow Corada on social media?
Scroll to the footer portion of the Corada site to view the clickable social follow icons; or click on the links below:
-
Facebook: https://www.facebook.com/coradaspeaks
-
Twitter: https://www.twitter.com/coradatweets or @CoradaTweets
-
Google+: https://plus.google.com/102477785174101823384/posts
-
LinkedIn: https://www.linkedin.com/company/9195154
-
YouTube: https://www.youtube.com/channel/UC05J1BvzSd2kVmjt0zSk3Rg?sub_confirmation=1
-
Pinterest: https://www.pinterest.com/coradapins/
-
Instagram: https://instagram.com/coradapix/ or @CoradaPix
FAQ: How do I speak to a live technical specialist?
Contact your local ADA Technical Assistance Center! This is not part of Corada, but is funded by your tax dollars.
Call: 1-800-949-4232
The ADA National Network provides information, guidance and training on how to implement the Americans with Disabilities Act (ADA) in order to support the mission of the ADA to “assure equality of opportunity, full participation, independent living, and economic self-sufficiency for individuals with disabilities.”

Funded by the National Institute on Disability, Independent Living, and Rehabilitation Research (NIDILRR), the network consists of ten Regional ADA Centers located throughout the United States and an ADA Knowledge Translation Center (ADAKTC).
Each Regional ADA Center focuses on its region’s unique needs. This regional focus is critical to ensuring that ADA National Network services meet the needs of a diversity of populations and stakeholders throughout the country.
User Comments/Questions
Add Comment/Question