Recreation Site Layout
Designing an attractive and functional recreation site is an art as well as a science. Accessibility is, of course, one of the many design parameters for any recreation site.
Vehicle Parking
Within recreation areas, vehicle parking is normally either concentrated into parking lots for more than two vehicles at group areas or distributed into parking spurs designed to hold one or two vehicles or trailers at an individual picnic or camping unit. Vehicle parking lots and other parking spaces that aren't associated with an individual camping or picnic unit must comply with the same requirements as vehicle parking lots for buildings. These requirements can be found in ABAAS, sections 208 and 502. However, slip resistance is not required for parking in recreation areas because leaves and needles, dirt, ice, snow, and other surface debris and weather conditions are components of the natural environment that would be difficult, if not impossible, to avoid.
Parking spurs for one or two vehicles, recreational vehicles (RVs), or trailers at individual picnic or camping units or at parking spaces for RV dump stations must comply with the requirements in section 3.1 of FSORAG. Parking spurs have two components; driveways and parking areas. The driveway is primarily a vehicle travel way that functions as an extension of the recreation site roadway. It provides vehicular access and a transition between the recreation site road and a vehicle parking area. The vehicle parking area is the section of the parking spur where vehicles (cars, vans, recreational vehicles, trucks, trailers, and so forth) are parked. These definitions are important because the scoping and technical requirements vary based on the specific part of the parking spur being addressed. Figure 57 shows the parts of a parking spur.
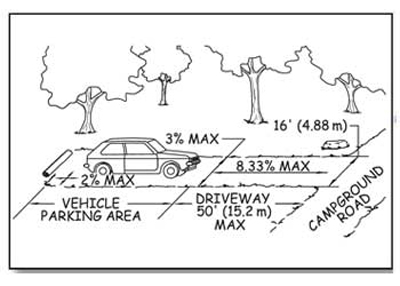
Figure 57—The components of a campground parking spur.
Because people use the parking spur to get to and from their vehicle and to get around the recreation site, ensure that the surface of the entire parking spur is firm and stable as explained in "Surfaces for Outdoor Recreation Access Routes" of this guidebook.
Ensure each vehicle parking area that is adjacent to a camp living area is at least 16 feet (4.88 meters) wide. The 16-foot (4.88-meter) width is the same as the standard width for an accessible parking stall for vans.
Sometimes, a single parking area for a double camping unit accommodates two vehicles side-by-side. In these parking areas, the space between the two vehicles can be used to access both vehicles, so you can reduce the total width of the two non-RV parking areas from 32 feet (9.76 meters) to 24 feet (7.32 meters).
Design Tip
Determine parking requirements for walk-in camping units.
For walk-in camping units, the required parking area width depends on whether the parking area is part of the camping unit or in a group parking lot. If the walk-in unit has its own parking spur, then it falls under Forest Service Outdoor Recreation Accessibility Guidelines parking spur requirements and the parking area should be 16 feet (4.88 meters) wide (as required by the vehicle parking area provision), or less if a condition for an exception applies. If the parking space is part of a group parking area such as a 10-car parking lot that is provided for eight walk-in units, the whole parking lot must meet the requirements of Architectural Barriers Act Accessibility Standards, sections F208 and 502. In such a 10-car parking lot, 9 parking spaces would be standard width and 1 would be 16 feet (4.88 meters) wide to comply with the van-accessible specifications of an 8-foot (2.44-meter) -wide parking space and an adjoining 8-foot ( 2.44-meter) -wide access aisle.
Provide enough width for full size accessible RVs and trailers in campgrounds that are designed to accommodate them (figure 58). A 16-foot (4.88-meter) -wide parking area will accommodate cars, vans, and the majority of RVs and trailers. However, a vehicle parking area that is 20 feet (6 meters) wide is required to accommodate lifts, ramps, and other assistive equipment that allow RV owners to enter, exit, and move around all sides of larger accessible RVs and trailers. The dimensions are based on an 8-foot (2.44-meter) -wide vehicle, an 8-foot (2.44-meter) -wide space on the passenger side for operation of the lift or ramp with room to maneuver and a 4-foot (1.22-meter) -wide clear space along the driver's side.
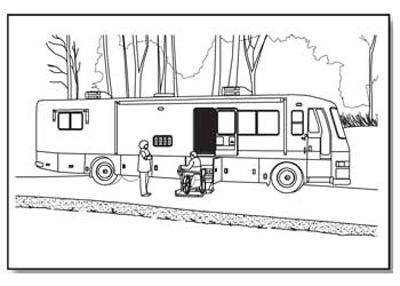
Figure 58— An accessible recreational vehicle with a wheelchair lift.
When parking areas for large accessible RVs accommodate two vehicles side-by-side in a parking area serving a double camping unit, the space between the two vehicles can be used to access both vehicles. Less width is required to provide the same access, so you can reduce the total width of the two RV parking areas from 40 feet (12 meters) to 36 feet (11 meters).
To maximize accessibility while protecting the natural environment, only a limited number of vehicle parking areas in campgrounds with RV camping units must be 20 feet (6 meters) wide. The minimum number of required 20-foot (6-meter) -wide vehicle parking areas is based on the total number of camping units provided in the RV campground (table 3).
Table 3—The number of recreational vehicle (RV) parking areas required to be accessible.
| Number of Camping Units | Minimum Number of 20-foot (6-meter) -Wide Vehicle Parking Areas Required in Campgrounds With Units Designed for Large RVs and Trailers |
|---|---|
| 1 | 1 |
| 2 to 25 | 2 |
| 26 to 50 | 3 |
| 51 to 75 | 4 |
| 76 to 100 | 5 |
| 101 to 150 | 7 |
| 151 to 200 | 8 |
| 201 and over | 8 plus 2 percent of the number more than 200 |
Basing the number of required 20-foot (6-meter) -wide RV parking areas on the number of RV camping units is similar to the approach used by ABAAS for accessible hotel rooms. The minimum required number of accessible rooms is proportional to the total number of rooms in the hotel. Similarly, the minimum number of accessible RV parking areas is proportional to the total number of RV camping units in the campground.
For example, in a 50-unit campground that accommodates large RVs and trailers, a minimum of three vehicle parking areas must be 20 feet (6 meters) wide. The vehicle parking areas for the remaining 47 camping units must be at least 16 feet (4.88 meters) wide, with the exceptions previously noted.
When designing a new campground, remember that table 3 shows minimum requirements. Larger RVs and trailers with bump-out sections are increasingly common. Areas where many recreationists use larger RVs and trailers may require providing more camping units with a 20-foot (6-meter) -wide vehicle parking area.
Some national forests have found the 20-foot (6-meter) -wide RV parking area to be an appropriate design standard for use throughout their RV campgrounds.
If there are one or more conditions for an exception that prevent constructing a full-width parking area (at least 16 feet (4.88 meters) wide or 20 feet (6 meters) wide as required by table 3), you can reduce the width to 13 feet (4 meters), the width of an accessible parking space for cars. Because new recreation site locations should be chosen carefully to ensure accessibility requirements can be met, this exception should hardly ever be taken. Even when conditions for exception are numerous and extreme, at least 20 percent of parking areas must be full width. When only one or two non-RV parking areas are provided in a recreation area, no exception is permitted. When three to 10 non-RV parking areas are provided, at least two of the vehicle parking areas must be full width.
There are separate slope requirements for vehicle parking areas and driveways because of the different functions they perform. Do not allow the slope of the vehicle parking area to exceed 1:48 (2 percent) in any direction. However, when the surface is not paved or built with boards, slopes up to 1:33 (3 percent) in any direction are allowed when needed for proper drainage.
Design Tip
Determine how long the parking area should be.
Forest Service Outdoor Recreation Accessibility Guidelines has requirements for parking area or spur width, but not length. Length of parking area spurs depends on the terrain and the type of vehicles that are expected to use the parking area. Ordinary parking lots are normally designed with 20-foot (6-meter) -long parking spaces to accommodate passenger vehicles, so parking areas should be at least 20 feet (6 meters) long. A large trailer with a towing vehicle could be up to 60 feet (18 meters) long and a bus-style recreational vehicle (RV) could be up to 45 feet (14 meters) long.
Some campgrounds include parking spurs of various lengths. This limits campsite choices for campers with larger trailers or RVs, but also minimizes hardened surfaces and ground disturbance, especially on difficult terrain. Provide information online and at the campground regarding the length of parking areas. Campers with larger trailers and RVs will appreciate it.
The running slope of a parking spur driveway may be up to 1:12 (8.33 percent) for 50 feet (15 meters). An exception for areas of steeper terrain permits the running slope to be up to 1:10 (10 percent) for 30 feet (9 meters). In alterations of existing campgrounds only, a second exception permits the running slope to be up to 1:10 (10 percent) for distances up to 50 feet (15 meters) if the first exception can't be met because of a condition for an exception. This second exception does not apply to new construction.
The cross slope of a parking spur driveway must not exceed 1:33 (3 percent). However, the cross slope of driveways may be as steep as 1:20 (5 percent) if needed for proper drainage or to provide a transition from the campground road to the vehicle parking area. For example, if a back-in parking spur is adjacent to an interior campground road that has a running slope steeper than 1:20 (5 percent), the driveway may need a steeper cross slope to make the transition from the running slope of the road to the relatively level vehicle parking area (figure 59).
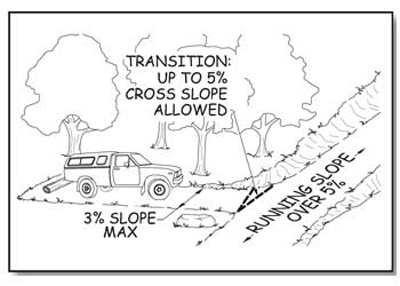
Figure 59—The transition from a parking spur driveway to a campground road.
Design Tip
Allow for pedestrians in the driveway.
Because people move around the vehicle parking areas and along the driveways, parking spurs also have to be able to function as outdoor recreation access routes.
Keep the running and cross slopes of driveways, even in alterations, as gentle as possible so that vehicles and people can easily and safely navigate into and out of the camping unit, erosion is minimized, and road design and construction standards are met.
Camping Units
A camping unit is a part of a campground that is used by an individual or group for camping separate from other parties using the recreation site. A camping unit commonly includes the camp living area, a parking spur, and a space to pitch a tent (figure 60). FSORAG doesn't require a specific number or type of camping units or constructed features, but all camping units and the site furnishings and constructed features in them must meet the applicable FSORAG requirements.
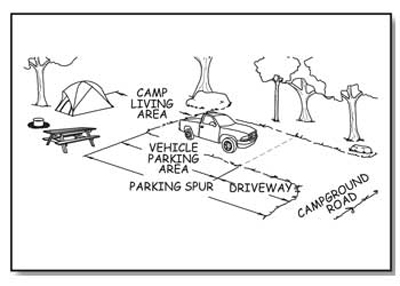
Figure 60—The components of a camping unit.
The camp living area is the space where tables, fire rings, and grills are located. This area is often adjacent to the parking spur. The minimum size of a camp living area is determined by the type and number of constructed features provided and the required clear space around each feature. Ensure the surface of camp living is firm and stable, and that the surface material used is appropriate to the setting and level of development. Do not allow the slope of the ground surface in camp living areas to exceed 1:48 (2 percent) in any direction, except when the surface is unpaved or is not built with boards. In those cases, the slope may be up to 1:33 (3 percent) for necessary drainage.
To meet outdoor recreation access route requirements, a route must connect all the features within each camping unit. Usually, the slope, surface, and size requirements for the overlapping or adjacent clear spaces of the constructed features within camp living areas eliminate the need for separate outdoor recreation access routes within the camp living area. When features are spread apart to limit the amount of change to the natural setting, provide outdoor recreation access routes to connect the features.
There must also be an outdoor recreation access route connecting each camping unit with the common use features that are provided at the campground, such as toilets, showers, water hydrants, garbage receptacles, parking spaces, and beach access. Ensure this outdoor recreation access route does not overlap the clear spaces of the camp living area so that people using the constructed features in the camp living area will not obstruct travel along the outdoor recreation access route.
There are some exceptions to the requirement that outdoor recreation access routes must connect everything.
-
When work is done to improve an existing camping or picnic facility or a trailhead and a condition for an exception prohibits full compliance with a specific technical requirement on part of an outdoor recreation access route, that part of the outdoor recreation access route only has to meet the technical requirement to the extent practicable.
-
When something is changed within an existing camping facility, but the circulation path isn't altered, the path doesn't have to be brought up to outdoor recreation access route standards.
-
As stated in "Getting From Here to There—Outdoor Recreation Access Routes" of this guidebook, if an accessible vehicle pull-up space is provided at the RV dump station, an outdoor recreation access route is not required to connect the station to the camping units.
-
In campgrounds where the roadway is the primary route from the campsites to the restrooms and so forth, a separate outdoor recreation access route to the same facilities is not required. That roadway is not required to meet the specifications for an outdoor recreation access route. However, there must be a minimum of 32 inches of clear passage through or around any constructed obstacles in the roadway, such as speed bumps.
Even when they're not required, the Forest Service commitment to universal design dictates that outdoor recreation access routes connect as many features as is practicable, given the specific natural constraints of the site, the level of development, and other considerations.
When walk-in camping is provided in a campground, ensure an outdoor recreation access route connects the camp living area to the parking spur or parking lot. If the terrain is steep (or there's another condition for an exception) and the work is an alteration to an existing site, compliance with the slope requirements for the outdoor recreation access route to those walk-in units isn't required.
When a camping unit is located near a trail (rather than in a campground accessed by vehicles), the connection between that unit and the trail and the connections between the constructed features within that camping unit must comply with FSTAG requirements for trails, not the outdoor recreation access route requirements.
Picnic Units
A picnic unit is a part of a picnic area that contains one or more constructed features used for picnics by an individual or a group. Each picnic unit may be used separately from other parties using the recreation site. All site furnishings and constructed features that are provided in a picnic unit must meet the applicable FSORAG requirements. The minimum size of a picnic unit is determined by the required clear space around each feature and the type and number of provided constructed features
Ensure all pedestrian routes that are provided in a picnic area meet outdoor recreation access route standards. Use an outdoor recreation access route to connect all features within each picnic unit. Usually, the slope, surface, and size requirements for the overlapping or adjacent clear spaces of the unit's constructed features within a picnic unit eliminate the need for separate outdoor recreation access routes within the unit. When features are spread apart to limit the amount of change to the natural setting, provide an outdoor recreation access route to connect the features.
If a picnic area only has one or two picnic units, connect all units with an outdoor recreation access route to the area's common use features, such as toilets, showers, water hydrants, garbage receptacles, parking spaces, and beach access routes. If a recreation site has more than two picnic units, use an outdoor recreation access route to connect at least 20 percent of the units (but never less than two) to the common use features at the site. For example, in a picnic area with 20 units, all site furnishings (tables, grills, etc.) must be accessible, and a minimum of four picnic units must be connected by an outdoor recreation access route to the area's other common use features.
When designing picnic areas, remember locating 20 percent of the units on an outdoor recreation access route is only a minimum requirement. Connect as many units with an outdoor recreation access route to the major features of the site as practicable, given the specific natural site constraints, the level of site development, and other considerations.
FSORAG recognizes that the natural terrain often presents a real obstacle in the outdoor recreation environment. At existing sites that are being renovated, you may not be able to provide an outdoor recreation access route for all picnic units without affecting the fundamental nature of the picnic area and the recreation opportunity. When an existing picnic area is altered or reconstructed and a condition for an exception prohibits full compliance with a specific technical requirement on part of an outdoor recreation access route, that part of the outdoor recreation access route only has to meet the technical requirement to the extent practicable. When something is changed within an existing picnic facility, but the circulation path isn't altered, the path doesn't have to be brought up to outdoor recreation access route standards. Even though it's not required, these changes almost always provide you the perfect opportunity to bring the paths up to outdoor recreation access route standards and follow the Forest Service policy of universal design.
Viewing Areas
Overlooks and viewing areas are designed and constructed to provide scenic vistas and unobstructed views of points of interest, such as a mountain range, a valley, a waterfall, or a unique geologic formation (figure 61). Because overlooks and viewing areas are destination points, they must be accessible so all visitors can enjoy the viewing opportunities. Ensure that each viewing area at an overlook and all the site furnishings, constructed features, and buildings in it, comply with applicable FSORAG and ABAAS provisions. However, when work is done to improve an existing viewing area or overlook and a condition for an exception prohibits full compliance with a specific technical requirement for a clear ground space, unobstructed view, turning space, surface, or slope, you only have to meet the requirement to the extent practicable.
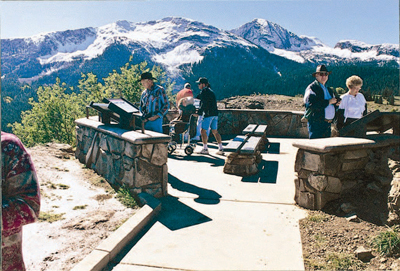
Figure 61—The overlook on the San Juan Skyway, a scenic byway in Colorado, allows all visitors to enjoy the view.
Viewing areas in recreation settings must be located along an outdoor recreation access route that connects to the other major features at the site, including the parking area. There are some exceptions to the requirement to connect everything with outdoor recreation access routes. Sometimes vistas can only be viewed from an area with difficult terrain. If a condition for an exception prohibits full compliance with a specific technical requirement for a portion of an outdoor recreation access route at a viewing area, you only must ensure that portion of the outdoor recreation access route complies with the technical requirement to the extent practicable. When something is changed within an existing overlook or viewing area, but the circulation path isn't altered, you don't have to bring the path up to outdoor recreation access route standards. Even though it's not required, renovations almost always provide you with the perfect opportunity to bring the paths up to outdoor recreation access route standards so that everyone can get to the viewing area or overlook.
Ensure each viewing area that is required to be accessible has a clear ground or floor space that is at least 36 inches (915 millimeters) by 48 inches (1,220 millimeters) and is positioned for either a forward or parallel approach to the viewing location. Each accessible viewing area must also have at least one turning space that is 60 inches (1,525 millimeters) minimum in diameter (figure 62) or is a T-shaped space with a minimum 60- by 36-inch (1,525- by 915-millimeter) arm and a minimum 36-inch (915-millimeter) -wide by 24-inch (610-millimeter) -long base (figure 63). The clear ground space and turning space may overlap. The turning space requirement is the same as ABAAS section 304.3. These spaces allow someone using a wheelchair or other assistive device to approach and move about the viewing area.
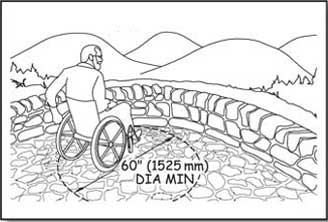
Figure 62—One way to meet the requirements for turning space at a viewing area.
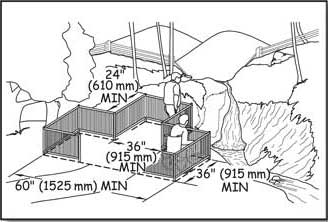
Figure 63—The requirements for a T-shaped turning space at a viewing area.
If there are several viewing areas, provide at least one accessible, unrestricted viewing opportunity for each distinct point of interest. An unrestricted viewing opportunity means a clear field of vision toward the vista or point of interest that extends at least from 32 to 51 inches (815 to 1,295 millimeters) above the entire side of the clear floor or ground space of the viewing area.
Ensure the slope of clear floor or ground spaces and turning spaces does not exceed 1:48 (2 percent) in any direction. When the surface isn't paved or built with boards, allow grades up to 1:33 (3 percent) in any direction if needed for proper drainage. Ensure the surface is firm and stable and of a material that is appropriate to the setting and level of development. Restrict openings in the surface of clear ground spaces and turning spaces to small enough that a ½-inch (13-millimeter) -diameter sphere can't get through them. Place elongated openings more than a quarter of an inch wide with the long dimension perpendicular to the primary direction of travel.
Viewing areas often are adjacent to hazardous dropoffs. When there is a dropoff of more than 30 inches (760 millimeters), provide a guardrail or barrier that complies with the height and opening requirements of the International Building Code, sections 1012.2 and 1012.3.
Barriers such as walls, guardrails, or signs installed for safety reasons could restrict views. However, neither accessibility nor safety measures should be ignored. Designers need to consider different ways of providing for safety without blocking the view. For example, narrow vertical rails, seethrough [sic] panels, or screened openings could be installed, or the designer may be able to build the overlook with a series of tiers or terraces (figure 64). The placement of interpretive signs may also help create a barrier to keep people back from the edge of the overlook without blocking the view (figure 65).
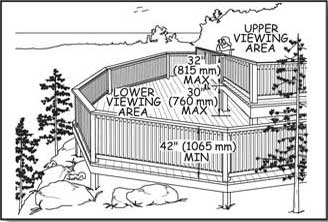
Figure 64—This overlook design has two levels so the railing can be lower at the upper viewing area.
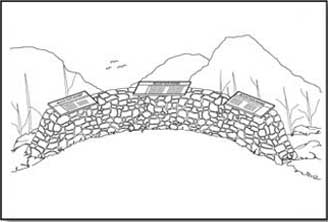
Figure 65—Signs placed to create a barrier at an overlook.
Design Tip
Design guardrails for safety and views.
Providing safety while maximizing viewing opportunities is a challenge for those designing a guardrail or structure adjacent to a dropoff. It's possible to design two viewing levels (see figure 64), where the lower level would be less than 30 inches (760 millimeters) below the upper level.
With this design, a tall guardrail isn't required for the upper level. At the upper level, where the visitors generally approach the viewpoint, a low railing or wall can permit good visibility. The lower viewing level would have a tall guardrail meeting the International Building Code requirements. This lower level provides the "catch" area for the primary level.
If the area or structure doesn't lend itself to a two-level approach, try a see-through 42-inch (1,065-millimeter) -high guardrail (figure 66). Place the vertical rails so that a 4-inch (100-millimeter) sphere can't pass through them. Visibility through this type of guardrail is excellent. The eye level of most adults seated in a wheelchair is above 42 inches (1,065 millimeters), and children sitting on the deck can enjoy the view through the rails.
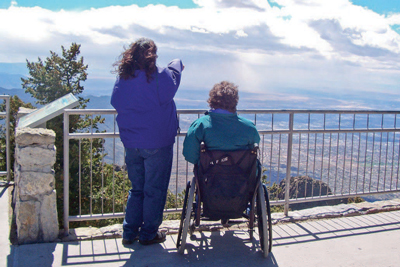
Figure 66—This railing on an overlook at Sandia Crest on the Cibola National Forest is safe, meets code requirements, and provides a great view for people of all heights.
The importance of vertical rather than horizontal rails can't be overemphasized. When children see horizontal rails, they regard them as an inviting ladder that encourages them to climb. A horizontal rail can't protect them from a fall (figure 67).

Figure 67—Caution: Railings with horizontal rails make an inviting ladder for small children.
Use of the International Symbol of Accessibility and Other Signs
Signs provide key information concerning the accessibility of programs and facilities. People often think of the International Symbol of Accessibility (ISA) (figure 68) as an all-purpose sign to be used any time an accessible feature is available, which is not necessarily true.

Figure 68—International symbol of accessibility.
In accordance with ABAAS, section 216, ISA must be posted at only six places:
-
At accessible parking spaces in parking lots with five or more designated parking spaces.
-
Sign van accessible parking spaces in these lots as such.
-
Sign RV accessible parking spaces in these lots as such.
-
Do not post ISA at parking spurs provided at camping units or other individual accessible features.
-
-
At accessible loading zones.
-
At accessible restrooms and bathing facilities.
-
At the main entrance to a building, with an arrow directing people to the closest accessible entrance, if the main entrance is not accessible.
-
On the door to an accessible area of refuge inside multistory buildings.
-
At an accessible means of egress out of a building.
Except for the requirement to post the VAN ACCESSIBLE plaque at van accessible spaces, no other descriptive words are required to be used with ISA. If words are used, use "accessible." Do not use "handicapped."
Where all constructed features and areas comply with the accessibility provisions, you may post ISA, but it is not required. Do not individually sign accessible sites with ISA because this can stigmatize and draw unwanted attention to the individuals using those sites.
When only some constructed features and areas comply with the accessibility provisions, people need to know whether they will be able to use a particular campsite or picnic area. This can be accomplished using several methods, depending on the type of campground or picnic area.
The Federal agency recreation reservation system (http://www.recreation.gov) contains accessibility information about campsites and picnic areas that are registered in the system, including which individual sites are accessible. When using this system to reserve a site, people are automatically notified if they are about to reserve an accessible site. ISA also can be used to identify individual accessible sites on the recreation site map on the Web site describing the recreation site. These are both good ways to provide accessibility information to recreationists with Internet access.
If some—but not all—campsites or picnic areas are accessible and recreationists choose their site when they arrive at the recreation area, provide accessibility information to recreationists as they enter the area. ISA can be used to identify the individual units that comply with the accessibility guidelines on the recreation site map at the entrance kiosk, fee station, bulletin board, or registration area. Post the following type of statement on the registration information sign: "Units 2, 4, 6, and 10 are accessible. If no one in your group needs an accessible site, please fill these units last." Forests that use this type of statement on the registration sign report that visitors generally have complied.
If some—but not all—campsites or picnic areas are accessible and the sites are assigned by a person onsite who can provide information about each unit, you don't have to post accessibility information. The accessible units should be assigned as requested by individuals. The accessible sites that are not assigned to persons with disabilities should be filled last, keeping them available in case they are needed. Do not ask people who request or reserve an accessible site to state or show any type of verification of their disability.
Their vehicles are also not required to display a license plate or placard indicating a disability. This site reservation and assignment process complies with the court-ordered process followed by hotels concerning their accessible rooms.
There is no legal requirement on federally managed lands for ISA signs to be blue and white, even at parking spaces. If ISA is used, post it on a vertical sign in accordance with ABAAS, section 703.7, in high-contrast colors with a nonglare finish. A cream or pale yellow ISA on a brown background complies with this requirement and blends into an outdoor setting.
If you want the local law enforcement agency to be able to issue tickets for illegal parking at accessible parking spaces in parking lots, display ISA in blue and white to comply with the Manual of Uniform Traffic Control Devices (MUTCD), section 2B.39. Although their use is optional, the only approved colors for pavement markings designating accessible parking spaces are blue and white (MUTCD, section 3B.18).
If a sign or kiosk has materials to be handled, such as maps, brochures, fee envelopes, and so forth, design the sign or kiosk so that the materials are displayed within the standard accessible reach ranges in accordance with ABAAS, section 308, as explained in "Reach Ranges and Operability Requirements" of this guidebook. Provide clear floor or ground spaces of 30 by 48 inches (760 by 1,220 millimeters) to allow a forward or parallel approach.
Post the appropriate international symbols where various modes of alternative formats, communication, or adaptive equipment are available. Large print, open captioning, sign language interpreters, and so forth are each represented by a specific symbol (figures 69 through 77).

Figure 69—International symbol for information.

Figure 75—International symbol to indicate sign language interpretation is available.

Figure 72—International symbol for video or film with closed captions.

Figure 70—International symbol for teletypewriter (also referred to as "TTY").

Figure 76—International symbol to indicate large print (18 point) material is available.

Figure 73—International symbol to indicate audio description is available.

Figure 71—International symbol for a telephone with volume control.

Figure 77—International symbol to indicate materials are available in Braille.

Figure 74—International symbol to indicate an assistive listening system is available.
If you have questions about applying any of the above information, please contact your region's recreation accessibility coordinator. Current contact information is available at http://www.fs.fed.us/eng/toolbox/acc/documents/coord.htm#leaders.
User Comments/Questions
Add Comment/Question