Important Tools for Accessible Recreation
The following tools work together with the accessibility guidelines when accessible recreation facilities and programs are being developed and managed.
The "Built Environment Image Guide" (BEIG) provides guidance for improving the image, aesthetics, sustainability, and overall quality of the Forest Service's built environment. It emphasizes key elements to showcase the Forest Service's national identity and an image of quality and service. Within eight geographically defined architectural character types, BEIG emphasizes design that projects the overall Forest Service image while echoing local values, heritage, and culture. Use of BEIG contributes to an integrated approach to planning and design, including early collaboration among planners, designers, specialists, managers, and maintenance personnel.
The goal of BEIG is to influence the design, construction, and maintenance of buildings and other constructed features so they will:
-
Fit on the land
-
Reflect sensitive site planning and a concern for natural processes
-
Harmonize with the local landscape and climate
-
Incorporate the principles of sustainability as an integral part of their architectural character
-
Be accessible
-
Be durable and low maintenance
BEIG specifically requires use of universal design principles and points out that if universal design principles are applied to a site or facility design from the outset, they rarely, if ever, have any obvious effect on architectural character. When the principles of universal design are skillfully executed, facilities can still fit seamlessly within the natural and social environments. More information about BEIG is available at http://www.fs.fed.us/recreation/programs/beig/.
Recreation Opportunity Spectrum and Recreation Site Scale
Recreation Opportunity Spectrum (ROS) classifications provide guidance on the:
-
Amount of development that is acceptable at any given site
-
Amount of deviation from the site's natural characteristics that is appropriate during development
-
Types of materials that are appropriate for the setting
-
Typical recreation activities in each setting classification (figure 23)
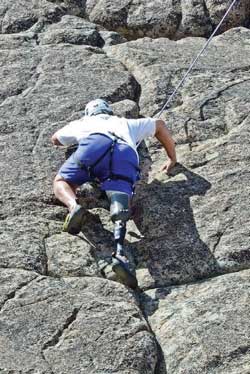
Figure 23—This free-style climber appears to enjoy the challenge, self-reliance, and independence characteristic of semi-primitive and primitive recreation opportunity spectrum settings. Photo credit: Disabled Sports USA, Rockville, MD
The spectrum assigns classifications of Urban, Rural, Roaded Natural, Semi-Primitive Motorized, Semi-Primitive Non-Motorized, and Primitive based on identified setting characteristics. Some units also include a Roaded Modified classification. Maps should be available at district or supervisor's offices showing ROS classification for the National Forest System lands administered by that unit. More information about ROS is available at http://www.fs.fed.us/cdt/carrying_capacity/rosfieldguide/ros_primer_and_field_guide.htm.
The amount of development at a site is described using a six-level recreation site planning development scale ranging from 0 (no site modification) to 5 (extensive site modification). Site modifications are provided for visitor convenience and comfort in recreation sites with characteristics meeting the criteria for scale level 3, 4, and 5. Rustic or rudimentary site modifications may be provided for resource protection at level 2 or less. Definitions of each level of the Forest Service's recreation site scale are included in the Forest Service Manual, Chapter 2330, exhibit 01.
Although neither ROS classifications nor the recreation site scale determine accessibility requirements, take both into account when designing site improvements. For instance, you may need improvements for resource protection in primitive and semi-primitive settings at recreation sites meeting the criteria for scale levels 1 or 2. In urban, rural, and roaded natural settings, you may want to provide improvements for visitor comfort and convenience at recreation sites meeting the criteria for scale levels 3, 4, or 5.
Wilderness Access Decision Tool
Details and implementation guidance for applying Title V, Section 507(c), the section of ADA that applies to Federal agencies and to the programs and facilities on federally managed lands, can be found at http://www.wilderness.net/index.cfm?fuse=toolboxes&sec=accessibility. Federal managers of wilderness areas can use this matrix to make appropriate, objective, and consistent decisions that meet the legal requirement to provide equal opportunity for all individuals, while ensuring no fundamental change to the wilderness experience for all individuals, in accordance with the 1964 Wilderness Act.
Appalachian Trail Conservancy's "Backcountry Sanitation Manual"
This comprehensive manual explains the basic issues of remote area sanitation, including health, aesthetics, and regulations, but it focuses on the construction and maintenance of moldering and composting toilets, and includes case studies and design plans. The "Backcountry Sanitation Manual" http://www.appalachiantrail.org/docs/trail-maintainers-corner/2011/04/14/backcountry-sanitation-manual.pdf is a cooperative project of the Green Mountain Club and the Appalachian Trail Conservancy.
Resolving problems of backcountry sanitation is a continuous challenge for trail clubs and land managers. This manual was created in the belief that all remote recreation areas will benefit from an expanded discussion of backcountry sanitation.
Pete Antos-Ketcham, Director of Operations, Green Mountain Club
Appalachian Trail Conservancy's "Increasing Opportunities for Access on the Appalachian Trail: A Design Guide"
Using the Forest Service's FSTAG and FSORAG, this design guide incorporates real-world Appalachian Trail examples as case studies that represent opportunities that can be used on other pedestrian trails. The guide's theme—universal design—transcends issues solely related to access for persons with disabilities by describing how universal design reduces resource damage and maintenance, saving money. The guide is available free of charge at http://www.appalachiantrail.org/docs/trail-maintainers-corner/increasing-opportunities-for-access-on-the-appalachian-trail-a-design-guide.pdf, (Appalachian Trail Conservancy 2007).
Accessibility Guidebook for Outfitters and Guides Operating on Public Lands
This guidebook contains a framework to help outfitters and guides who operate under a special-use permit from the Forest Service provide high-quality services for all visitors (figure 24). The guidebook addresses basic facility accessibility issues, but focuses primarily on program and activity accessibility. Outfitters and guides who operate businesses on public lands are governed by ADA because they are providing public accommodations and are also governed by Section 504 of the Rehabilitation Act because they are operating under special-use permits from Federal agencies. The guidebook identifies legal requirements and provides suggestions and practical tips for complying with ADA and Section 504 of the Rehabilitation Act. The guidebook is available at http://www.fs.fed.us/recreation/programs/accessibility/.
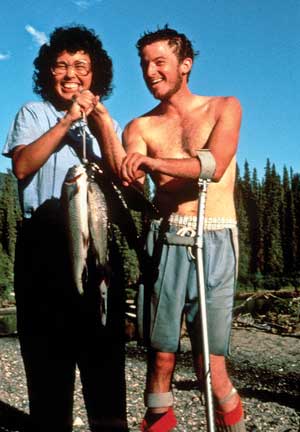
Figure 24—Outfitters and guides provide the logistics and support for visitors to enjoy a wide range of opportunities on national forests, including fishing.
Accessibility Guidebook for Ski Areas Operating on Public Lands
This guidebook provides a framework to help ski areas operating under special-use permits from the Forest Service better serve all visitors (figure 25). The guidebook addresses facility and program accessibility. Ski areas located on public lands are governed by ADA because they are providing public accommodations and also are governed by Section 504 of the Rehabilitation Act and related regulations because they are operating under special-use permits from a Federal agency. The guidebook includes legal mandates, suggestions, and practical tips for complying with laws and regulations and providing high-quality services. The guidebook is available at http://www.fs.fed.us/recreation/programs/accessibility/.
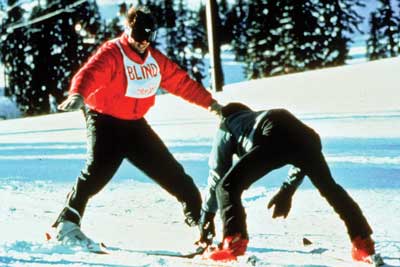
Figure 25—Ski areas that operate on public land must provide equal opportunity to access their services.
Cooperative Publications
The Federal Highway Administration (FHWA) cooperates with the Forest Service to provide Forest Service publications and videos to the public. Many publications are available at http://www.fhwa.dot.gov/environment/fspubs/index.htm in HTML and PDF (Acrobat) formats. Print copies for some publications can be ordered at http://www.fhwa.dot.gov/environment/rectrails/trailpub.htm.
Standard Forest Service National Trail Specifications
The engineering management publication "Standard Specifications for Construction and Maintenance of Trails" (EM–7720–103) provides a uniform set of specifications for contracted trail work throughout the Forest Service. Although these specifications do not address accessibility, they can be used in conjunction with FSTAG. The publication is available at http://www.fs.fed.us/database/acad/dev/trails/trails.htm.
Trail Construction and Maintenance Notebook
The Missoula Technology and Development Center's "Trail Construction and Maintenance Notebook" contains basic trail building information. It is available at http://www.fhwa.dot.gov/environment/fspubs/07232806/index.htm.
ETA Editor's Note
The above referenced "Trail Construction and Maintenance Notebook" is now located here: https://www.fhwa.dot.gov/environment/recreational_trails/publications/fs_publications/07232806/index.cfm
Although this document doesn't address accessibility, it is an important tool that you can use in conjunction with FSTAG during trail construction and planning.
Designing Sidewalks and Trails for Access
FHWA's "Designing Sidewalks and Trails for Access" is a two-part report on pedestrian accessibility, (Beneficial Designs Inc. 1999 and 2001).
-
Part 1, Review of Existing Guidelines and Practices (1999), lays out the history and the practices of applying accessibility concepts to sidewalks and pedestrian trails. This report is out of print and available only at http://www.fhwa.dot.gov/environment/sidewalks/index.htm.
-
Part 2, Best Practices Design Guide (2001), provides recommendations on how to design sidewalks, street crossings, intersections, shared-use paths, and recreational pedestrian trails. This report is out of print and available only at http://www.fhwa.dot.gov/environment/sidewalk2/index.htm.
-
A Transmittal Memorandum and an Errata Sheet are available at http://www.fhwa.dot.gov/environment/bikeped/guidance.htm#Access.
Accessibility guidelines and practices, as well as construction and maintenance techniques, have evolved since these reports were published. More current information is available in other reports and guidance. For example, see the U.S. Access Board's public rights-of-way Web site www.access-board.gov/guidelines-and-standards/streets-sidewalks/public-rights-of-way, which includes guidance documents and other resources. Documents available at the U.S. Access Board's Outdoor Developed Areas Web site http://www.access-board.gov/guidelines-and-standards/recreation-facilities/outdoor-developed-areas include reports, such as the "Special Report: Accessible Public Rights of Way Planning and Designing for Alterations" and guidelines about outdoor developed areas. The U.S. Access Board also is considering "Shared Use Path Accessibility Guidelines" http://www.access-board.gov/guidelines-and-standards/streets-sidewalks/shared-use-paths/about-this-rulemaking, for trails that are part of a transportation network. FHWA has additional accessibility information on its Accessibility Resource Library Web site at http://www.fhwa.dot.gov/accessibility/.
Planning and Designing Outdoor Recreation Facilities for Horses
"Equestrian Design Guidebook for Trails, Trailheads, and Campgrounds," a comprehensive technical resource, details those elements of planning, design, and construction that are specific to equestrian trails, trailheads, and campgrounds. The report is available at http://www.fhwa.dot.gov/environment/fspubs/07232816/index.htm.
ETA Editor's Note
The link above is no longer valid. The document "Equestrian Design Guidebook for Trails, Trailheads, and Campgrounds" is now found here: https://www.fhwa.dot.gov/environment/recreational_trails/publications/trailpub.cfm.
The Facilities Toolbox
The "Facilities Toolbox" is an interactive Forest Service facility management Web site designed to help line officers and their staffs manage facilities effectively. The toolbox focuses on issues at administrative sites, but also contains topics such as accessibility, partnerships, recreational fees, historic facilities, and water and wastewater. The toolbox can be accessed at http://www.fs.fed.us/eng/toolbox/.
Natural Resource Manager
Natural Resource Manager http://basenet.fs.fed.us/ (available only to Forest Service employees) is the Forest Service corporate integrated data management tool developed for the purposes of inventory, asset management, and upward reporting of information concerning constructed features, including their associated financial data. The site-specific accessibility data fields (number of accessible units, etc.) are on the Recreation Site module's Site Core 2 tab. It is an annual national requirement that this information be kept up to date. Feature-specific accessibility data entry (fields are on the Recreation Site module's Features tab) is not a national requirement; data entry in those fields is optional and it is up to regions or forests to decide if they want to record data.
Recreation and Heritage Resources Integrated Business Systems
This recreation resources management system identifies customer standards that the Forest Service expects to provide across all recreation and heritage resources program areas. Standards form the baseline for estimating the total cost for quality visitor opportunities and services. Compliance with the accessibility guidelines (figure 26) is an important quality measure within the national standards for recreation sites under the responsiveness key measure. The Natural Resource Manager database houses recreation information including inventory, operation and maintenance costs, recreation use data, and information on accessibility. The database is used to implement the recreation resources management system.
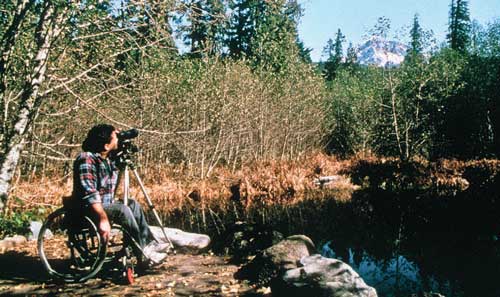
Figure 26—The perfect photo spot—a spectacular view and the right mix of resource protection, site development, and accessibility.
Deferred Maintenance
Maintenance work includes improving accessibility as well as compliance with building codes. Include the costs for any uncompleted work that is needed to bring a building into compliance with the provisions of ABA that were in force at the time of construction or major improvement to the building in the Natural Resource Manager database deferred maintenance costs.
If the transition plans to bring the structures into compliance with ABA provisions have not been completed, include the cost to complete them in the deferred maintenance figure because the plans were due for completion before the current fiscal year. The transition plan process (per 7 CFR 15e, section 150) is as follows:
-
Evaluate the facility.
-
Record improvements needed to meet accessibility standards.
-
Develop the transition plan, including:
-
Items to be improved.
-
Schedule with completion dates for improvements that will take more than 1 year to finish.
-
When the transition plan is completed and approved, include the costs to implement accessibility code improvements in the deferred maintenance figure. How and when the costs are included as deferred maintenance depends on the scheduling recorded in the transition plan. Costs for actions scheduled for the current year are immediately included in the deferred maintenance figure. Costs for actions that are past due as of the current fiscal year are also included in the deferred maintenance figure. Costs for actions scheduled for future years aren't added to the current year's deferred maintenance figure. These costs are added as deferred maintenance in the year they are scheduled for completion. As work is completed, it should be shown as an accomplishment in the Natural Resource Manager database for that fiscal year.
Construction and Maintenance Practices
Even the best universal design can be ruined, often unintentionally, by construction or maintenance practices that turn accessible design features into barriers. Construction engineering and inspection personnel must have a thorough understanding of the design intent and of accessibility issues or they must check with the designer before allowing any deviations from the design. Field changes, such as increasing the slope on a walkway to reduce the cost of asphalt paving or increasing the drop at an exterior door threshold to reduce issues with driving rain, can make the entire project inaccessible.
Construction Tip
Avoid unintended consequences.
Consider accessibility when construction is in progress. Any change order intended to solve one problem could create another. For example, standard speed humps can slow speeding traffic in a campground, but they can also become barriers if the main pedestrian access route through the campground is the roadway. Stagger speed humps to block only one lane at a time or limit them to the center of the road, leaving 32 inches (815 millimeters) of clear passage at each side. Both of these approaches will slow traffic without blocking access.
Maintenance and operations activities can help or hinder accessibility. Provide information on accessibility when training maintenance personnel. When employees understand how their work can affect accessibility, they can look for ways to improve accessibility. For example, trained maintenance and recreation personnel will know not to put a chair or garbage receptacle beside the door of an accessible restroom stall that would prevent the door from opening fully and thus render the stall inaccessible. They will know that picnic tables fastened to the floor of a picnic shelter to prevent theft must be spaced far enough apart so that everyone can use them. They will know not to allow gravel walkway material to erode away from the entrance to a campground restroom, creating an elevation change that makes the restroom inaccessible (figure 27).
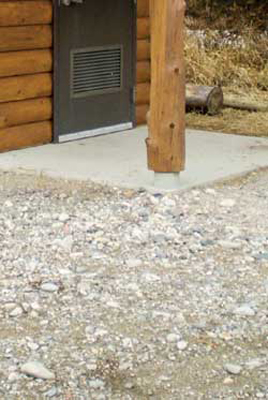
Figure 27—At this campground restroom entrance, the gravel walkway material has sunk or eroded, making the restroom inaccessible due to the difference in elevation between the walkway and the concrete.
Maintenance also can be an opportunity to improve accessibility. A series of small changes can make a big difference.
Design Tip
Use the VanHorn Roll to minimize maintenance.
Consider how time and normal weathering will affect accessibility when designing recreation areas. For instance, at the point where the concrete pad for a restroom meets the gravel outdoor recreation access route that connects it to the rest of the campground, gravel often erodes away from the concrete, leaving a drop in grade that doesn't meet accessibility requirements. Solve this problem by rolling the edge of the concrete down under the gravel surface of the outdoor recreation access route, as shown in figure 28. This is known as the "VanHorn Roll," named for the Unita-Wasatch-Cache National Forest recreation technician who invented the concept. A similar design can be used to keep the junction between asphalt and concrete surfaces accessible over time, as shown in figure 29.
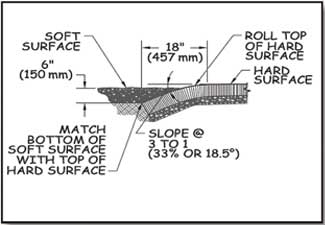
Figure 28—The VanHorn Roll is a design strategy to prolong the time a junction between concrete and gravel pedestrian surfaces meet the accessibility requirements without importing additional gravel to replace material that has eroded away.
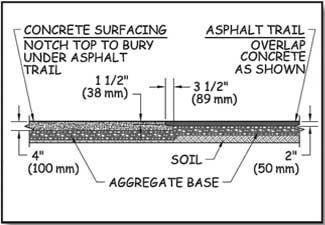
Figure 29—Differential settlement is less likely to occur between adjacent asphalt and concrete walking surfaces if the asphalt is overlaid onto a notch of the adjacent concrete surface.
Maintenance Tip
Improve accessibility through maintenance.
Improved accessibility doesn't always mean new construction or major renovation. Maintenance and routine service present many opportunities to improve accessibility.
An accessible surface is firm and stable. Use caution with the size and depth of gravel when maintaining unpaved surfaces. Generally, smaller gravel with some fine material can be compacted to a firmer surface than larger gravel or gravel that is all the same size. Depending on the surfacing material, mixing in some soil stabilizer may provide an accessible, natural-appearing surface.
Practical Approach
The surface is probably firm and stable if ruts are not left by:
-
Someone riding a bicycle with narrow tires
-
Someone pushing a 3-year-old in a folding stroller with small plastic wheels
On paved parking lots, designating the required accessible spaces is relatively easy when repainting the parking lot stripes, especially right after the lot has been seal-coated. Ensure that the appropriate wide, striped access aisles are provided next to each designated accessible parking space. The key to accessible parking is the striped zone next to it that ensures adequate space next to the vehicle to allow people to get into and out of their vehicle even if they use a wheelchair, crutches, or a walker.
Designating accessible parking spaces on gravel lots can be a problem because paint won't stay in place. If you designate accessible parking spaces only with a sign, designate end locations closest to the entrance. Ensure that accessible parking signs are 60 inches (1,524 millimeters) high and curb cuts are located appropriately—next to, not in the parking space or access aisle.
Building entries must be within ¼ inch (6.4 millimeters) of being flush with the grade of the outside access route and have a beveled doorsill that isn't more than ½ inch (13 millimeters) high. Sometimes it's fairly easy to add surfacing material, shim up the deck or porch boards, or use asphalt or concrete to bring the access route up to the building floor.
The surface at the base of water hydrants at recreation areas must be at least 72 inches (1,830 millimeters) by 48 inches (1,220 millimeters) and must be firm and stable. Consider building a grate and drain, or a paved surface, around hydrants if a soil or gravel surface can't be made firm and stable. If you don't have funding for a major site renovation, repair the area around a few hydrants at a time.
When operating controls need replacing, think about accessibility. To comply with accessibility guidelines, all controls must be operable by one hand without pinching, grasping, or twisting the wrist and with no more than 5 pounds (2.2 newtons) of pressure. When accessible parts are ordered, consider ordering extra parts for future replacements.
Practical Approach
If you can operate the control with one closed fist and with less than 5 pounds (2.2 newtons) of pressure, the control is accessible. Three ways to provide accessibility: push button, sensory-operated, and lever handle controls (figures 30, 31, and 32).
Figure 30—Push button control.
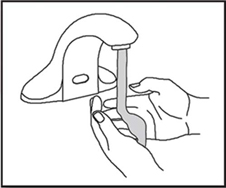
Figure 31—Sensory-operated control.
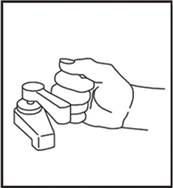
Figure 32—Lever handle control.
User Comments/Questions
Add Comment/Question