Independent Wheelchair Transfers in the Built Environment: How Transfer Setup Impacts Performance Phase 2: Final Report
Space Needs
Figure 7 was composed to provide a general idea of the variability observed among participants in 1) the amount of space in front of the platform required by each participant and their WMDs and 2) the physical locations of these spaces relative to the first platform. Subjects in general required more width (distance along the x-axis) than depth (distance along the y-axis) when performing transfers to this platform. Also there was a tendency for more subjects to position themselves to the right of the platform, than directly in front of or to the left of the platform.
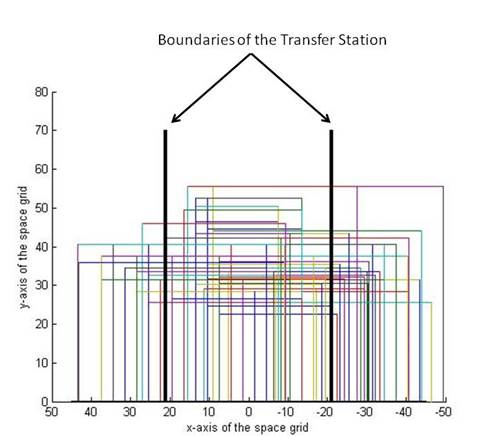
Figure 7. The black lines represent the boundaries of the transfer station which is centered around the zero point on the x-axis and expands out to 21 inches from the center of platform on either side. Each colored box in this figure represents the amount of area used by each study participant and their WMD (72 total boxes). The x-axis is the width of the grid space and the y-axis is the total depth of the grid space (see figure 1 above as a reference).
Tables 11, 12 and 13 illustrate how and what percentage of individuals in the study positioned themselves within a defined floor area centered on the transfer station. Percentages were calculated instead of percentiles due to complexity of the measures (see Data Analysis section in the Methods for further explanation). All participants were able to transfer inside a space with a depth of 55.5 inches (along the y-axis as shown in Figure 7). Table 11 shows that for a given width of 40 inches (centered in front of the transfer station) that 25% of the subjects were able to perform a transfer to the platform in Protocol A (no grab bars or backrest on the station) whereas for a given width of 100 inches (e.g. 50 inches on either side of the transfer station) 100% of subjects were able to perform a transfer to the platform during Protocol A.
Table 11. Percentage of subjects who were able to transfer within each clear floor space dimension for Protocol A transfer TO and FROM the platform at their maximum height (Max) and minimum height (Min).
| Space (inches x inches) |
A Max TO |
A Max FROM |
A Min TO |
A Min FROM |
|
40x55.5 |
25% |
25% |
21% |
21% |
|
44x55.5 |
28% |
30% |
21% |
23% |
|
48x55.5 |
36% |
37% |
27% |
28% |
|
52x55.5 |
46% |
48% |
39% |
42% |
|
56x55.5 |
50% |
51% |
42% |
45% |
|
60x55.5 |
66% |
65% |
53% |
56% |
|
64x55.5 |
73% |
72% |
62% |
62% |
|
68x55.5 |
76% |
76% |
62% |
63% |
|
72x55.5 |
82% |
82% |
76% |
77% |
|
76x55.5 |
87% |
87% |
83% |
85% |
|
80x55.5 |
87% |
87% |
86% |
88% |
|
84x55.5 |
92% |
92% |
90% |
91% |
|
88x55.5 |
97% |
97% |
94% |
94% |
|
92x55.5 |
97% |
97% |
96% |
97% |
|
96x55.5 |
99% |
99% |
97% |
99% |
|
100x55.5 |
100% |
100% |
100% |
100% |
Table 12. Percentage of subjects who were able to transfer within each clear floor space dimension for Protocol B transfer TO and FROM the platform at their maximum height (Max) and minimum height (Max)
| Space (inches x inches) |
B Max TO |
B Max FROM |
B Min TO |
B Min FROM |
|
40x55.5 |
23% |
24% |
21% |
21% |
|
44x55.5 |
23% |
27% |
21% |
21% |
|
48x55.5 |
34% |
35% |
27% |
30% |
|
52x55.5 |
48% |
46% |
39% |
42% |
|
56x55.5 |
49% |
49% |
42% |
46% |
|
60x55.5 |
65% |
66% |
53% |
53% |
|
64x55.5 |
75% |
73% |
62% |
67% |
|
68x55.5 |
76% |
77% |
62% |
70% |
|
72x55.5 |
82% |
82% |
76% |
77% |
|
76x55.5 |
87% |
87% |
83% |
83% |
|
80x55.5 |
87% |
87% |
86% |
84% |
|
84x55.5 |
91% |
92% |
90% |
90% |
|
88x55.5 |
96% |
97% |
94% |
94% |
|
92x55.5 |
96% |
97% |
96% |
96% |
|
96x55.5 |
99% |
99% |
97% |
97% |
|
100x55.5 |
100% |
100% |
100% |
100% |
Table 13. Percentage of subjects who were able to transfer within each clear floor space dimension for Protocol C transfer TO and FROM the platform at their maximum height (Max) and minimum height (Min (note: that there was one subject who positioned himself 52 inches right of center with respect to station (outlier)).
| Space (inches x inches) |
C Max TO |
C Max FROM |
C Min TO |
C Min FROM |
|
40x55.5 |
21% |
20% |
20% |
23% |
|
44x55.5 |
21% |
21% |
20% |
23% |
|
48x55.5 |
30% |
30% |
30% |
31% |
|
52x55.5 |
48% |
46% |
42% |
44% |
|
56x55.5 |
51% |
50% |
45% |
46% |
|
60x55.5 |
65% |
62% |
55% |
52% |
|
64x55.5 |
76% |
75% |
69% |
69% |
|
68x55.5 |
76% |
75% |
69% |
69% |
|
72x55.5 |
83% |
80% |
75% |
75% |
|
76x55.5 |
90% |
89% |
85% |
85% |
|
80x55.5 |
90% |
89% |
85% |
87% |
|
84x55.5 |
94% |
93% |
88% |
90% |
|
88x55.5 |
97% |
96% |
94% |
94% |
|
92x55.5 |
97% |
96% |
96% |
96% |
|
96x55.5 |
97% |
97% |
97% |
97% |
|
100x55.5 |
100% |
99% |
100% |
100% |
|
104x55.5 |
- |
100% |
- |
- |
A 60 inch wide turning space dimension similar to that found in the ADA-ABA is shown mapped onto the grid space in front of the transfer station in Figure 8. The ADA-ABA depth of 60 inches would accommodate all the subjects in this study whereas a 60 inch width would only accommodate between 52% and 66% of the subjects depending on the type of transfer (with or without grab bars and backrest) and direction of transfer (to or from the platform) (Tables 11-13).
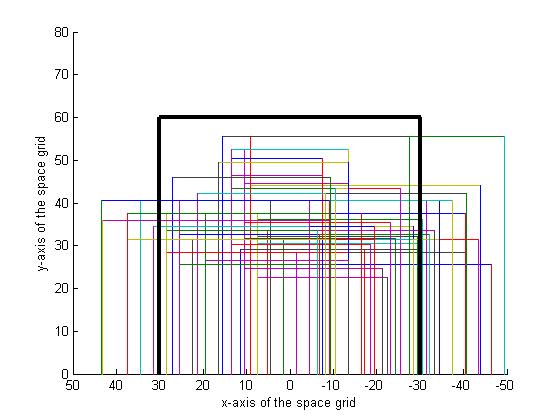
Figure 8. The black lines represent the boundaries of a standard clear floor space dimension of 60 x 60 inches. Each colored box in this figure represents the amount of area used by each study participant and their WMD (72 total boxes). The x-axis is the width of the grid space and the y-axis is the total depth of the grid space (see figure 1 above as a reference).
The angle of approach (Figure 2), the angle at which WC users were located with respect to the station, was measured and recorded for each transfer to and from the transfer station. Tables 14 and 15 shows the 5th, 25th, 50th, 75th and 95th percentiles, the maximum and minimum values for the angles of approach used when transferring to and from the transfer station
Table 14. Angle of approach transferring TO the station
|
|
Percentiles |
|
|
|||||
|
Protocol |
5th |
25th |
50th |
75th |
95th |
Maximum |
Minimum |
|
|
A. Level: No Grab Bars/No Backrest |
||||||||
|
Angle (degrees) |
0.0 |
14.5 |
28.0 |
50.0 |
90.0 |
90.0 |
0.0 |
|
|
A. Maximum Height: No Grab Bars/No Backrest |
||||||||
|
Angle (degrees) |
0.0 |
18.0 |
30.0 |
53.0 |
90.0 |
90.0 |
0.0 |
|
|
1. Minimum Height: No Grab Bars/No Backrest |
||||||||
|
Angle (degrees) |
0.0 |
17.0 |
30.0 |
50.0 |
90.0 |
90.0 |
0.0 |
|
|
1. Maximum Height: Grab Bars/No Backrest |
||||||||
|
Angle (degrees) |
0.0 |
12.0 |
27.0 |
50.0 |
90.0 |
90.0 |
0.0 |
|
|
1. Minimum Height: Grab Bars/No Backrest |
||||||||
|
Angle (degrees) |
0.0 |
13.5 |
28.0 |
52.5 |
90.0 |
90.0 |
0.0 |
|
|
1. Maximum Height: Grab Bars and Backrest |
||||||||
|
Angle (degrees) |
0.0 |
11.8 |
24.5 |
44.0 |
90.0 |
90.0 |
0.0 |
|
|
1. Minimum Height: Grab Bars and Backrest |
||||||||
|
Angle (degrees) |
0.0 |
12.3 |
28.0 |
49.3 |
90.0 |
90.0 |
0.0 |
|
Table 15. Angle of approach transferring FROM the station
|
|
Percentiles |
|
|
|||||
|
Protocol |
5th |
25th |
50th |
75th |
95th |
Maximum |
Minimum |
|
| A. Level: No Grab Bars/No Backrest | ||||||||
|
Angle (degrees) |
0.0 |
14.5 |
30.0 |
50.0 |
90.0 |
90.0 |
0.0 |
|
| A. Maximum Height: No Grab Bars/No Backrest | ||||||||
|
Angle (degrees) |
0.0 |
18.0 |
30.0 |
53.0 |
90.0 |
90.0 |
0.0 |
|
| A. Minimum Height: No Grab Bars/No Backrest | ||||||||
|
Angle (degrees) |
0.0 |
17.0 |
30.0 |
50.0 |
90.0 |
90.0 |
0.0 |
|
| B, Maximum Height: Grab Bars/No Backrest | ||||||||
|
Angle (degrees) |
0.0 |
12.0 |
27.0 |
50.0 |
90.0 |
90.0 |
0.0 |
|
| B. Minimum Height: Grab Bars/No Backrest | ||||||||
|
Angle (degrees) |
0.0 |
13.5 |
28.0 |
52.5 |
90.0 |
90.0 |
0.0 |
|
| C. Maximum Height: Grab Bars and Backrest | ||||||||
|
Angle (degrees) |
0.0 |
11.8 |
24.5 |
44.0 |
90.0 |
90.0 |
0.0 |
|
| C. Minimum Height: Grab Bars and Backrest | ||||||||
|
Angle (degrees) |
0.0 |
12.3 |
28.0 |
49.3 |
90.0 |
90.0 |
0.0 |
|
User Comments/Questions
Add Comment/Question