Evaluating the Accessibility of a Meeting Site
The following descriptions and accompanying images are designed to help determine if a meeting location has the most basic accessible features needed by participants with disabilities. If not, sometimes a temporary modification can be made that will create access for the day of the meeting. It is essential to remember, however, that such temporary access does not relieve facility owners of their continuing obligations under the ADA to remove barriers and provide increased access to people with disabilities after the meeting has ended. Linked to the descriptions of accessible features are several common access barriers and suggestions for removing them temporarily. By reading the descriptions, carefully reviewing the images provided, and considering temporary barrier removal suggestions, organizers can determine whether a meeting place accommodates all participants either as is or with some short-term changes. If a meeting site cannot be made at least temporarily accessible, another site should be selected. To access the legal minimum standards associated with each feature, see the ADA Standards for Accessible Design (http://www.ada.gov/stdspdf.htm) The Standards are also available on the U.S. Department of Justice website www.ada.gov or by calling 800-514-0301 (voice) or 800-514-0383
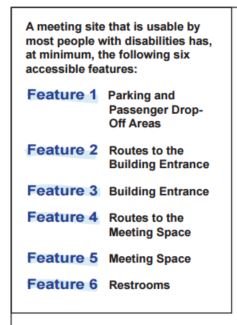
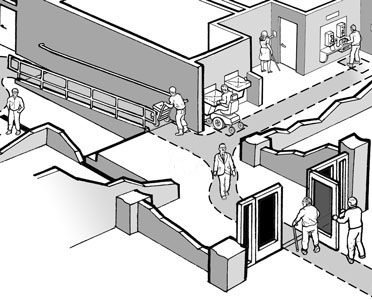
Feature 1 - Parking and Passenger Drop-Off Areas
When parking is provided for meeting participants, accessible parking must be provided for participants with disabilities. Those who arrive by car or van need an accessible parking space as close as possible to an accessible entrance. The accessible parking space has an adjacent and parallel access aisle that provides needed room for a person to open the car door fully and then to stand with the aid of a walker or crutches, to transfer to a wheelchair, or to lower a wheelchair lift. In order to be usable, the access aisle must be level, clear of gravel or mud, and the surface must be in good condition without wide cracks or broken pavement.
If there is a drop-off area for meeting participants, an accessible passenger drop-off area is also necessary. An accessible drop-off area has a level access aisle that is adjacent and parallel to the vehicle space to serve the same purposes as described above for a parking access aisle.
The access aisles of both the parking space and passenger drop-off area connect directly to an accessible route that leads to an accessible building entrance. When an accessible route crosses a curb, a curb ramp must be provided. ADA Standards for Accessible Design | Temporary Barrier Removal Suggestions for Accessible Features
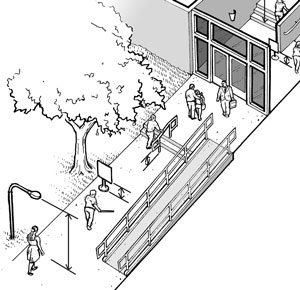
Feature 2 - Routes to the Building Entrance
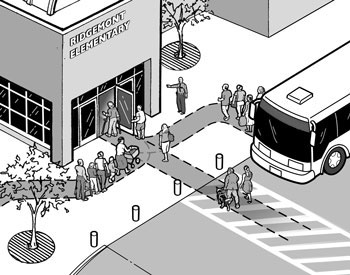
Accessible routes connect accessible onsite features (e.g., bus stop, parking) to the building entrance.
There must be at least one exterior accessible route that connects accessible parking spaces and other accessible elements within the site, such as accessible drop-off areas or a route from a bus stop to an accessible building entrance. The accessible route is essential for people who have difficulty walking or who use wheelchairs or other mobility devices to get to the accessible entrance of the meeting site.
An accessible route is at least 36 inches wide for the entire length of the route. (It may narrow briefly to 32 inches wide at utility poles, post-mounted signs, street furniture, and doorways.) Abrupt level changes, steps, or steeply sloped sidewalks cannot be part of an accessible route. Where ramps are used, they cannot be steeper than 1:12 (8.33% incline). Ramps with a vertical rise of more than 6 inches must have handrails on both sides. Ramps must also have edge protection to stop crutch and walker tips and wheelchair wheels from slipping off the sides, and level landings at the top and bottom of each segment and where a ramp changes direction.
Wherever possible, the accessible route should coincide with the main route to the building. However, if an accessible route is different from the route used by other participants, signs are required at key decision points to direct participants with disabilities to the accessible route to the building.
It is important to note that people who are blind or have low vision may use all routes -- not only the accessible ones -- that lead to a building. Therefore, objects that do not provide sufficient head clearance or that are mounted too high and protrude into a route can become hazards because they cannot be detected by people who are blind or have low vision and use canes. All routes must be free of overhanging objects that are less than 80 inches above the ground. There must also be no objects that protrude more than 4 inches into the route when the bottom edges of the objects are between 27 inches and 80 inches above the ground. Examples of potential protruding objects include handrail extensions on stairs and ramps, post- or wall-mounted signs, outdoor drinking fountains, and low-hanging tree limbs. ADA Standards for Accessible Design (http://www.ada.gov/stdspdf.htm) Accessible routes connect accessible onsite features (e.g., bus stop, parking) to the building entrance.
Common objects along pedestrian routes to the meeting can be hazards to people who are blind or have low vision.
Feature 3 - Building Entrance
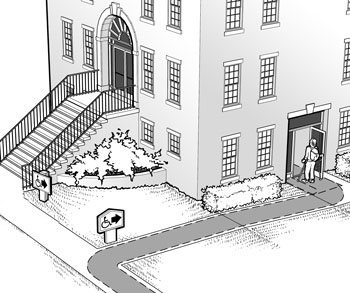
Signs for an alternate accessible entrance are posted at inaccessible entrances and key decision points along the accessible route.
An accessible meeting location must have at least one accessible entrance that is connected to an accessible route. An accessible entrance must provide at least one accessible door with maneuvering space, accessible door hardware, and enough clear width to allow people who use crutches, canes, walkers, scooters, or wheelchairs to use it.
The accessible entrance should be the main entrance whenever possible. If the accessible entrance is not the main entrance to the meeting site, then signs must be located at all inaccessible entrances to direct participants to the accessible one. The accessible entrance must remain unlocked when the meeting is taking place. ADA Standards for Accessible Design | Temporary Barrier Removal Suggestions for Accessible Features
Feature 4 - Routes to the Meeting Space
Accessible interior routes to the meeting space
The interior accessible route connects the accessible entrance with the meeting space. Typically made up of hallways, corridors, and interior rooms and spaces, the accessible route is essential for people who have difficulty walking or who use wheelchairs or other mobility devices.
The accessible route to the meeting space must have the same characteristics as the accessible route to the building entrance. ADA Standards for Accessible Design | Temporary Barrier Removal Suggestions for Accessible Features
It is important to note that people who are blind or have low vision may use all routes -- not only the accessible ones -- that lead to the meeting space. Therefore, objects that do not provide sufficient head clearance or that are mounted too high and protrude into a route can become hazards because they cannot be detected by people who use white canes. (See Routes to the Building Entrance for a detailed description.) Items that can become hazards include wall-mounted fire extinguishers, display cases, and sconces, as well as open staircases, overhead signs and banners, and the curved sides of arched doorways.
Feature 5 - Meeting Space
The meeting space must have an accessible floor plan. Temporary Barrier Removal Suggestions for Accessible Features | Arranging an Accessible Meeting Space
Feature 6 - Restrooms
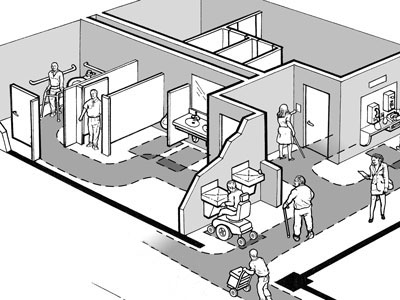
An accessible restroom with accessible amenities (e.g, drinking fountains) outside the space.
If restrooms are available to meeting participants, then accessible restrooms must also be available to participants with disabilities. Accessible restrooms should be in the same basic location as other restrooms. An accessible stall has a door wide enough to enter; floor space for a wheelchair user to roll up to the toilet; grab bars on the back and side wall nearest the toilet to support the person as he transfers from and back to his wheelchair; a toilet seat at wheelchair seat height to facilitate transfer; a flush valve and toilet paper dispenser within reach; and door hardware that does not require tight pinching, twisting, or grasping to use.
An accessible lavatory has floor space in front so that a wheelchair user can approach it, knee clearance so the person can pull under it, and a lowered top surface height so the person can reach the faucets and soap dispenser and use the bowl easily. The lavatory's hot water and drain pipes have to be insulated or configured to prevent leg burns or injuries, and the lavatory may not have sharp or abrasive surfaces underneath. Faucets can not require tight pinching, twisting, or grasping to operate (i.e., they are operable with a closed fist). An accessible lavatory is not necessarily one with an extended, shallow bowl - many different lavatories can work if installed properly. Soap dispensers, paper towel dispensers, hand dryers, and trash cans should be near the sink (but not blocking fixtures or dispensers) and within the reach range of someone who is seated or of short stature. Ensure that furniture (e.g., a chair, a large trash can) does not block maneuvering clearances at doors or fixtures and that hand dryers and dispensers are not mounted where they become protruding objects. ADA Standards for Accessible Design | Temporary Barrier Removal Suggestions for Accessible Features
User Comments/Questions
Add Comment/Question