Accessible Emergency Shelters
One of the most important roles of State and local government is to protect people from harm, including helping people obtain food and shelter in major emergencies. When disasters occur, people are often provided safe refuge in temporary shelters located in schools, office buildings, tents, or other facilities. Advance planning for an emergency shelter typically involves ensuring that the shelter will be well stocked with basic necessities, such as food, water, and blankets. Planning should also involve ensuring that these shelters are accessible to people with disabilities. Making emergency sheltering programs accessible is generally required by the Americans with Disabilities Act of 1990 (ADA).

A. Evaluating the Physical Accessibility of Emergency Shelters
In order to be prepared for an emergency that requires sheltering, accessible features should be part of an emergency shelter. A first step to providing an accessible shelter is to identify any physical barriers that exist that will prevent access to people with disabilities. One good way to do this is to inspect each shelter facility that your community plans to use in an emergency and identify barriers to people with disabilities, including people who use wheelchairs or scooters or who have difficulty walking, people who are deaf or hard-of-hearing, and people who are blind or who have low vision. Facilities built or extensively altered since the ADA went into effect in 1992 may have few barriers to accessibility and could be good choices for emergency shelters. Facilities built before 1992 and not altered to provide accessibility may have barriers that prevent access to people with disabilities.
When evaluating physical accessibility in older facilities, it may be a good idea to do the analysis in two parts. If you suspect that an older facility is not accessible, you can do a preliminary analysis before completing a detailed accessibility survey. This preliminary analysis, or quick-check, can eliminate facilities with extensive barriers so that the focus can be on those facilities that are most appropriate to become accessible shelters. To help identify older buildings that may be good candidates to become accessible shelters, a copy of the Accessible Shelter Quick-Check Survey is provided on page 7. After completing the Quick-Check Survey, if you have checked “Yes” for most of the questions on the forms, you should conduct a full accessibility survey using the ADA Checklist for Emergency Shelters.
If you find barriers to accessibility after completing the checklist, the next step is to either remove the barriers or identify other nearby accessible facilities that can serve as a shelter. In communities with more than one emergency shelter, until all shelters are accessible, the locations of accessible shelters should be widely publicized, particularly to people with disabilities and organizations that serve the disability community.
B. Conducting Accessibility Surveys
The following Quick-Check Survey (beginning on page 7) and the ADA Checklist for Emergency Shelters (beginning on page 11) are designed to assist State and local officials and operators of emergency shelters to determine whether a facility being considered for use as an emergency shelter is accessible and if not, whether modifications are needed to remove barriers or whether relocation to another accessible facility is necessary. Filling out the Quick-Check Survey will provide guidance on whether a facility has certain basic accessible features, and filling out the detailed ADA Checklist for Emergency Shelters will provide specific information on any barriers to accessibility.
C. Getting Started
Individuals conducting the surveys need not be experienced in evaluating facilities for accessibility. The checklist provides guidance on how to complete the survey and will prompt the user to check key elements. The checklist pages also provide space for notes and other key information. The checklist is designed to prompt the user to check key features by asking questions about sizes, sloped surfaces, and availability of accessible features; and in some areas, it suggests alternatives if a physical barrier is identified. By following the directions provided for filling out the checklist, staff can identify accessible shelters and develop information needed to implement temporary and permanent accessibility modifications.
An evaluation of shelter accessibility should focus on those areas of the facility that may be used for providing shelter in an emergency. These include areas where people are dropped off by a bus, van, or car; the parking area; the entrance to the shelter; pedestrian routes (both exterior and interior); sleeping, eating, information, and recreational areas; and toilet rooms.
Before shelter accessibility is evaluated, it is useful for staff to review the instructions for filling out the checklist and become familiar with the questions. It is also helpful to practice taking measurements, photographs, and recording information. On the day of the survey, it is helpful to first become familiar with certain areas before starting to record information. Upon arrival at the proposed shelter, first find the areas where people will disembark from vehicles, both passenger drop-off and loading zones as well as parking areas. Next find the entrances to the shelter areas that will be used during an evacuation. If possible, take an identifying “location” photograph that shows the name of the facility and the address so that other photographs can be identified correctly. When inside the building, locate the areas where people are likely to register, sleep, and eat. Locate the toilet rooms that serve the shelter area. It is also a good idea to locate any areas used for telephones, food distribution, and medical services.
D. Tools Needed
The following items are needed for the survey:
-
A metal tape measure that is at least 20 feet long;
-
A digital level or bubble level that is 24 inches long;
-
A door pressure gauge;
-
A digital (preferred) or film camera with a flash;
-
One copy of the checklist for each shelter (and Quick-Check Survey if used); and
-
A clipboard and pens.
If you are not familiar with taking the types of measurements needed to complete the checklist, review the following section and practice using the tools before going to conduct a survey.
E. Taking Measurements
1. Sloped Surfaces
Measuring the slope of a ramp, parking space, walkway, or other ground or floor surface is important to identify whether the surface is accessible. The amount of slope or grade is described as the proportion of a vertical rise to a horizontal length. It is usually described as:
-
a ratio (e.g., 1:20, which means one unit of vertical rise for each 20 units of horizontal length); or
-
a percentage (e.g., 8.33% which equates to a ratio of 1:12 or 4.76 degrees).
The easiest way to measure slope is to use a digital level. The digital display gives a reading that may be shown as a percent, degrees, or as a digital bubble. Before using a digital level, make sure to understand the directions for its use. It will need to be calibrated before each use. The maximum running slope generally allowed for ramps is 1:12 (8.33% or 4.76 degrees). Cross slope is the slope or grade of a surface perpendicular to the running slope. The most cross slope allowed on an accessible route is 1:50 (2% or 1.15 degrees).
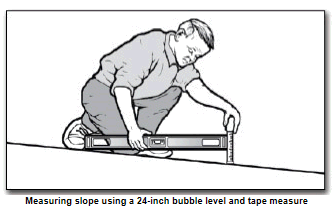
Another way to measure slope that requires more effort is to use a 24-inch level with leveling bubble and a metal tape measure. Place the level on the sloped surface in the direction you wish to measure. Rest one end of the level at the highest point of the sloped surface and lift the other end (see below) until the bubble is in the middle of the tube. This is the “level” position. While the level is in this position, measure the distance between the end of the level and the sloped surface below. If the distance is two inches or less, then the slope is 1:12 or less. When the distance is more than two inches, record the distance on the checklist so the exact slope can be calculated later. For measuring cross slope, if the distance, measured from the level position, is ½ inch or less then the slope is 1:48 or less.

2. Using the Tape Measure
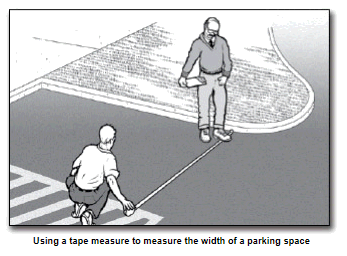
A metal tape measure is needed to measure the length, width, height, and depth of various elements. When measuring long distances, pull the tape tight to get an accurate measurement. The checklist will offer guidance for the specific measurement that is required.

3. Measuring Door Openings
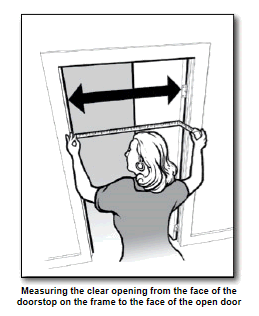
Special care is needed when measuring the clear opening of a doorway. To measure the clear opening of a standard hinged door, open the door to 90 degrees. Place the end of the tape measure on the side of the door frame next to the clear opening (see below). Stretch the tape across the door opening to the face of the door. This measures the clear width of the door opening through which people pass, which is less than the width of the door itself.

F. Taking Photographs
A comprehensive set of photographs makes it easier to understand existing conditions after the survey is completed. It is a good idea to take many photos of the exterior and interior of the potential shelter. It is likely that many other people in your decision-making process will need to review information about the facility you are surveying, so try to record each element that you survey with several photos. It is always useful to first take a photo that will clearly identify the location of the element so that others will easily be able to find the element. Then, take several close-up shots of that element to document the conditions you found during your survey. If you are not familiar with the camera that you plan to use, practice using it both indoors and outdoors before starting to survey the various facilities being considered for use as shelters. If you are using a digital camera, it is a good idea to review the images as you take them to ensure that you have good quality photographs.
G. Completing the Survey and Checklist
The survey and checklist forms will prompt you for what to look at and where to measure. You should write down all answers and notes for use later in the planning process. If a photo is taken of a particular element or condition, then you should note this on the checklist. It is usually more efficient for two or three people to work together doing these surveys. One person can measure while the other records the information and takes photos.
For each item, check either “Yes” or “No.” If the measurement or number falls short of that required for accessibility, write the measurement or number to the right of the question. Add notes or comments as needed. For some questions when “No” is the answer, the checklist will include a prompt to check for an alternate solution. Information on possible alternative solutions can be used later to decide how to better provide accessibility. Taking several photos is also helpful when the answer is “No” and an alternative way to provide accessibility is not readily apparent.
When completing the survey or checklist, try to answer every question in each section unless the element is not present at that facility. For example, if no parking lot is provided at the facility, (such as where only on-street parking is provided), do not measure the size of the on-street parking spaces.
Some sections of the checklist are divided into two parts, one for individuals with a mobility disability and the other for individuals who are blind or who have low vision. While evaluating a facility you will be checking to ensure that an accessible route is provided. The accessible route is a continuous unobstructed pedestrian path without steps or steep slopes that connects all accessible site and building features and spaces together. A continuous accessible route must be available at the shelter for people who use a wheelchair, scooter, or other mobility device. Other sections of the checklist ask questions related to individuals who are blind or have low vision. These questions cover all circulation paths, not just pedestrian paths that are also an accessible route.
The survey and the checklist are based on some of the requirements from the ADA Standards for Accessible Design (the Standards). Questions have been selected to reflect features that may be most important for the short-term stays common for emergency shelters. To learn more about the Standards, see the Department of Justice regulations, 28 C.F.R. Part 36, Appendix A. The regulations and the Standards are available at www.ada.gov. Copies are also available by calling the ADA Information Line at 800‒514‒0301 (voice) or 800‒514‒0383 (TTY).
H. After Completing the Survey and Checklist
Once you have completed the survey and filled out the checklist, you can determine which elements or spaces in a potential shelter facility are accessible and which may need modifications. If most answers are “yes,” the facility may need little or no modification. If some answers are “no,” modifications may be needed to remove barriers found in that space or element. Emergency shelters in older buildings with inaccessible features might be made accessible with temporary modifications, (such as portable ramps at the entrance and accessible parking spaces marked off by traffic cones) until permanent modifications can be made. However, where facilities are not capable of being made accessible, another facility will need to be selected for use as a shelter.

User Comments/Questions
Add Comment/Question