Appendix: Checklist for APR Installations
(adapted from “Accessible Pedestrian Signals: A Guide to Best Practice”, NCHRP Web-only document 117A).
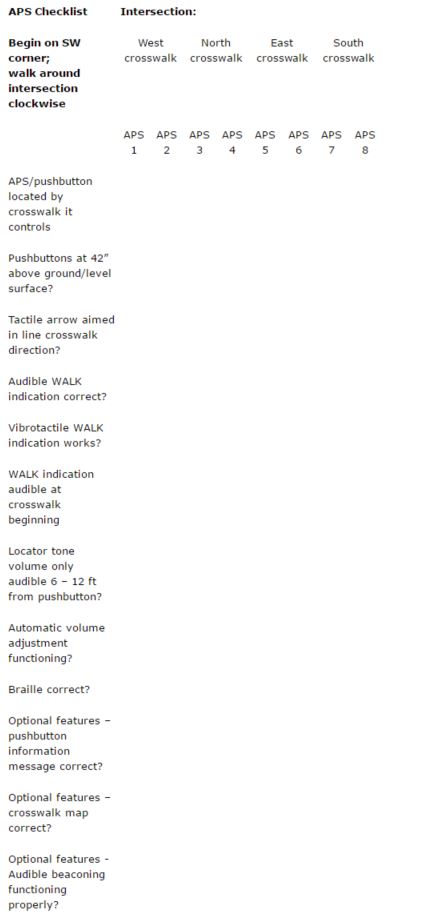
Once installation is complete, the installer should perform the following steps, for each APS at the intersection:
- Check the location of the APS; Is it close to the crosswalk it controls?
- Check the height of the pushbutton
- Check the tactile arrow to be sure it is in line with crosswalk
- Confirm proper functioning of the audible WALK indication
- Confirm proper functioning of the vibrotactile WALK indication
- Evaluate and adjust the WALK indication volume
- Evaluate and adjust the locator tone volume
- Evaluate and set the sensitivity level of the automatic volume adjustment
- Check Braille, if provided
- Check optional features
- Check audible beaconing
Check the location of the APS; is it close to the crosswalk it controls?
Each APS should be close to the crosswalk it controls, preferably in line with the crosswalk line farthest from the intersection. APS for other crosswalk should be farther away, and less audible.
Check Height and Location of the Pushbutton
Confirm that pushbutton height and location conform to specifications and can be reached by a person in a wheelchair, from a hard surfaced level landing.
Check Tactile Arrow
Check that the tactile arrow is aligned in the direction of travel on the crosswalk.
Confirm that the arrow points to the street that is controlled by that pushbutton.
Confirm Proper Functioning of the Audible Walk Indication
Press the button and wait for the Walk indication. Confirm that it sounds at the proper time for the street.
The Walk indication (tone or speech message) should sound for the duration of the walk interval, unless there is a special setting due to a rest in “Walk” situation.
If the Walk indication is a speech message, confirm that it refers to the correct street and is appropriately worded and understandable.
Confirm that the vibrotactile indications work
The tactile arrow or vibrating surface should vibrate rapidly only during the walk interval for the street.
Evaluate and adjust the volume of the Walk indication
Stand at the curb or end of the curb ramp at the crosswalk and listen for the Walk indication. It should be audible from the crossing location, but it should not be audible across the street.
Confirm that the Walk indication for each crosswalk sounds closer than the Walk indication for the perpendicular crosswalk.
Listen through several cycles at times when traffic is noisy and at times when traffic is quiet and adjust the Walk indication volume as necessary.
Evaluate and adjust locator tone volume
Approach the intersection from both directions along the sidewalk and note when the pushbutton locator tone is audible. If there are two pushbutton locator tones at the corner, each should be audible. The pushbutton locator tone should be audible 6 to 12 ft from the pushbutton or at the building line, whichever is closer to the pushbutton.
Approach the corner from the crosswalk and note when the pushbutton locator tone is audible. The pushbutton locator tone should be audible at 6 to 12 ft (or approximately one lane) from the pushbutton.
Listen through several cycles at times when traffic is noisy and at times when traffic is quiet and adjust the locator tone volume as necessary.
Set the Automatic Volume Adjustment
Evaluate and set the sensitivity level of the automatic volume adjustment. If volumes are adequate in quiet conditions, but do not increase enough or quickly enough when ambient noise increases, the microphone sensitivity, or automatic gain control, may need to be increased.
Increase the microphone sensitivity in 10% to 20% steps until the response is as desired. It might be necessary to readjust the volume of the locator tone and Walk indications after the microphone or “dB over ambient” setting is adjusted.
Check Braille
Confirm that braille dots are raised to the touch. If possible, have a person who reads Braille confirm that the name on APS is the name of the street that the arrow points toward.
Check Optional Features, if available
Pushbutton information message - Press the pushbutton for an extended button press to see if the pushbutton information message plays and that it accurately identifies the crossing controlled by the pushbutton and that other information, if provided, is accurate.
Crosswalk map - Confirm that a tactile map accurately represents the crossing features.
Audible beaconing – If installed, press the pushbutton for an extended button press and confirm that the locator tone sound is boosted on that crosswalk during the following pedestrian phase (FDW), and walk across the street during the pedestrian phase and evaluate placement and aiming of devices for providing sound in the crosswalk area.
Recheck Device Functioning at a Later Time
Follow up during the first few weeks after installation, checking device and volume at a different time of day to ensure proper functioning.
Designate a person and phone number to call and report any malfunctioning device. Share that information with agencies serving individuals who are blind and with community organizations of individuals who are blind.
User Comments/Questions
Add Comment/Question