Evaluating the Physical Accessibility of Polling Places
When choosing a new site for a polling place, elections officials should select a facility that is accessible to voters who use wheelchairs or scooters or who have difficulty walking. Planning for an upcoming election also gives elections officials the opportunity to improve existing polling places that are not accessible by using temporary elements, such as portable ramps, on election day or by working with building owners to make permanent alterations that improve the accessibility of the polling place.
The following checklist is designed to help voting officials determine whether a polling place has basic accessible features needed by most voters with disabilities. It may be used when evaluating the accessibility of potential new polling places and when identifying physical barriers in existing polling places before temporary or permanent modifications are made to improve accessibility for elections.
Individuals completing the checklist do not necessarily need to be experienced in evaluating buildings and facilities for accessibility. The checklist is designed to prompt the user to check key features by asking questions about sizes, sloped surfaces, and availability of accessible features, and in some areas it suggests alternatives if a physical barrier is identified. By following the directions provided for filling out the checklist, voting staff and volunteers can identify accessible polling places and develop information used for implementing temporary and permanent modifications.
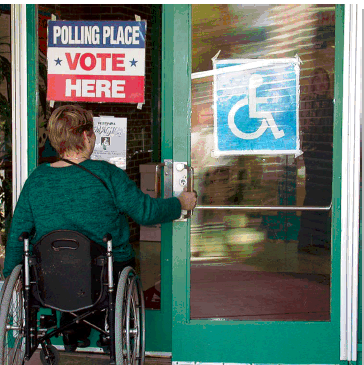
A voter enters an accessible polling place.
Getting Started
An evaluation of polling place accessibility should focus on those areas of a facility that are important to voting. These often include parking for voters, a drop off or loading area, the entrance to the polling place, and the pedestrian routes (both exterior and interior) that voters use to get to the voter check-in and voting area.
Before a polling place is evaluated, it is useful for staff or volunteers to review the instructions for using the checklist and become familiar with the questions. It is also helpful to practice taking measurements and recording information before beginning the evaluation.
When staff arrive at a polling place, it is best to first determine the location of parking, including accessible parking (if any is provided), the entrance that will be used on election day, and the location of the voting area. If the survey is being done to determine the accessibility of a new location for a polling place, then the walk-through should look for areas that provide the best accessibility, where simple modifications may provide accessibility, or where it may be easiest to improve accessibility by adding temporary features.
Using the Polling Place Checklist
Tools and Documentation
A few simple tools may be used to measure the sizes and the slope of specific elements and spaces:
• A metal tape measure at least 15-feet long
• A level with a bubble measure or a digital measure at least twenty-four inches long for measuring slope, and
• A clipboard, copy of the checklist (one copy per polling place), and pens or pencils.
It is also a good idea to have a film or digital camera to document important areas that may need to be reviewed later. Any camera may be used to shoot photographs but one with a flash is most useful, particularly when indoor photos are needed.
Use the Checklist to Record Data
The checklist is designed to prompt the users on what to look at and where to measure. All answers and notes should be recorded on the checklist for use later in the planning process. When completed, the checklist should provide an indication of the level of accessibility at the polling place. If photographs are taken during the survey, it is helpful to note on the checklist that a photo was taken for later review of particular elements, spaces, or conditions.
Completing Measurements and Recording Information
One person can complete a survey of a polling place but it is often quicker and easier for two people to work together. One can be responsible for taking the measurements and the other for recording the information and taking any photographs.
Taking Measurements
Sloped Surfaces
One way to measure slope is to use a 24-inch level with leveling bubble and a tape measure. Place the level on the incline in the direction you wish to measure. Rest one end of the level at the highest point of the sloped surface and lift the other end (as shown in the illustration) until the bubble is in the middle of the tube. This is the “level” position. While the level is in this position, measure the distance between the end of the level and the sloped surface below. If the distance is 2 inches or less, then the slope is 1:12 or less. When the distance is greater than 2 inches, record the distance on the checklist so the exact slope may be calculated later if needed.
Slopes may also be measured using a digital level. The digital display replaces the bubble and typically gives a reading that may be shown as a digital bubble, degrees, or a percent. Before using a digital level make sure to familiarize yourself with the directions. Many digital levels need to be calibrated each time they are used. If you can set the digital display to percent or degrees, the maximum slope generally allowed is 8.33% or 4.76 degrees (for a 1:12 slope).
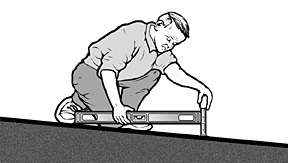
Measuring slope using a 24-inch level and tape measure
Using the Tape Measure
When measuring the width of a parking space or access aisle, the width of an accessible route or the height of an object above the floor, for example, try to keep the tape from sagging or bending. If the tape is not straight, try to support the tape in the middle or pull it tight and take the measurement again.
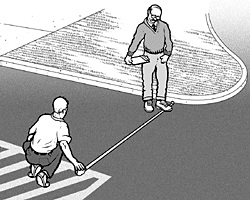
Using a tape measure to measure the width of a parking space
Measuring Door Openings
Measuring the clear opening of an accessible door requires special care. To measure the opening of a standard hinged door, open the door to 90 degrees. Place the end of the tape measure on the side of the door frame next to the clear opening (as shown in the drawing). Stretch the tape across the door opening to the face of the door. This measurement equals the clear open width of the door, which is typically less than the width of the door.
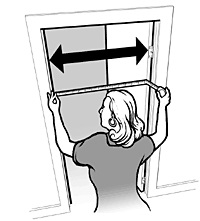
Measuring the clear opening from the face of the doorstop on the frame to the face of the open door
Completing the Checklist
For each checklist item, check either “yes” or “no.” If the measurement or number falls short of that required for accessibility, write the measurement or number to the right of the question in the area under “Comments.” Add notes or comments as needed. For some questions when “no” is the answer, the checklist will include a prompt to check for an alternate solution. Information on alternate access can be used later as voting officials decide how to provide accessible voting.
When completing the survey, it is important to try to answer every question in each section, unless, of course, the element is not present at the particular site under review. For example, if there is no parking provided on-site at the polling place, or only on-street parking is provided, there is no need to try to measure the size of the parking spaces or to count the number of parking spaces.
The checklist is based on requirements from the ADA Standards for Accessible Design (Standards). Each item includes a reference to the technical requirements in the Standards from 28 C.F.R. Part 36, Appendix A. This reference is provided to assist users in looking up the requirement or related requirements when necessary. An electronic copy of the Standards is available on the ADA Website at www.ada.gov. Printed copies are also available from the ADA Information Line at 800‒514‒0301 (voice) or 800‒514‒0383 (TTY).
After Completing the Survey
Completed polling place surveys will provide the information needed to determine which sites are accessible and which may become accessible with permanent or temporary modifications. Checklists where most answers are “yes” will usually indicate an accessible polling place. Others, where some answers are “no,” may become accessible if permanent or temporary modifications are done to remove barriers. Polling places in older buildings may have few accessible features but some of these voting facilities may be able to be made accessible with temporary modifications, such as portable ramps at the entrance and accessible parking spaces marked off by traffic cones. There may also be some sites that cannot be made accessible so plans will be needed to offer accessible voting in some other way.
For more information about temporary modifications, see Temporary Solutions for Election Day at the end of each section of this document.
Alterations
When State and local governments make permanent modifications or alterations to facilities that serve as polling places these alterations must comply with the ADA Standards.
For more information visit the ADA Website to view or download the ADA Standards, technical assistance materials, and general ADA information.
For specific questions about the ADA, call the Department of Justice ADA Information Line.
800‒514‒0301 (voice)
800‒514‒0383 ( TTY)
User Comments/Questions
Add Comment/Question